- Create Wiki Page
- All Pages

Considering how expensive anvils can be to players with fresh worlds, they are not necessities until you are ready to upgrade your armor, tools, and weapons to have the best enchantments possible.
Anvils are some of the only Minecraft blocks—like gravel, sand, and the dragon’s egg—that is affected by gravity, meaning they fall through the air until there is any solid block beneath them. Falling anvils can actually harm a player if it hits them, meaning that they can be used as (expensive) projectiles. Anvils can even cause up to 20 hearts of damage if they fall from a height of 40 blocks.
Anvils can be found in the decoration blocks section of the creative menu.
To make an anvil in Minecraft, you will need:
To make an anvil, you will need to place 4 iron ingots and 3 iron blocks in the 3x3 crafting grid. Fill the top row with the iron blocks, then fill the last row with iron ingots. Finally place 1 iron ingot in the center of the grid. Once you complete making the anvil, move it to your inventory.
Here is the step-by-step pictorial guide you need to follow to make an anvil in Minecraft:
The first thing you will need to make anvil is a crafting table. To make a crafting table, convert any recently acquired logs into wooden planks.
To make wooden planks, simply place the logs that were collected into one of the slots in the survival inventory crafting table, as demonstrated below.
Once the logs are converted into wooden planks, you can then progress to making a crafting table. This guide explains more about how to make a crafting table.
You will need a crafting table to make the simplest type of pickaxe for collecting your first pieces of cobblestone, as well as making your first anvil once you’ve collected all the necessary materials. You need cobblestone to make a furnace. The first part of making a pickaxe is making the sticks for the handle. You can use the survival inventory crafting table or the crafting table you just created to make your sticks.
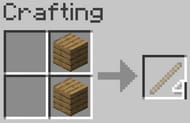
To make sticks, place two blocks of wooden planks above each other on either the left or right side of the square, as shown above.
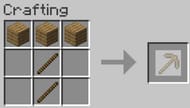
Now you have to make a pickaxe; this can be done by interacting with a crafting table. Next, in the crafting table, place a row of planks along the top of the crafting GUI and place two sticks under the middle plank, as seen above. This will create a pickaxe to use to collect your cobblestone—a required block for making a furnace.
To find out more about how to make a furnace, use this guide.
Next you have to find some iron and coal.
To make an anvil, you will need to collect a substantial amount of iron. Iron is quite abundant in caves and ravines though, so it shouldn’t be too difficult or time consuming to collect the amount you require. To collect iron, however, you need at least a stone pickaxe. Iron pickaxes do work faster.
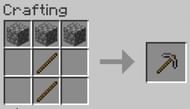
To make a stone pickaxe, you use the same recipe as stated before but replace the wood with cobblestone. An example is provided below. To make an iron pickaxe, follow the same recipe but exchange the cobblestone with iron ingots.
Iron and coal spawn quite frequently and can be found around caves and ravines, in cliffsides, or even at the surface in stone-topped biomes.
Once you’ve found coal, mine it. Coal is the easiest source of fuel to use when smelting this amount of iron, but you can also use other forms of fuel like charcoal or a lava bucket if found more convenient. Once you have a sufficient amount of coal to smelt all of your future findings, you can begin to look for iron.
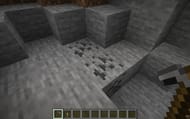
Iron generates in the generally same locations as coal and can be found really easily both in surface caves and below the surface.
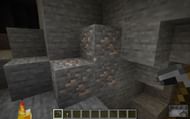
Once you’ve found all 31 (or more) pieces of your iron, you have to smelt them.
To smelt, use your furnace to smelt the iron down to ingots. You can also use a blast furnace, which will smelt the metal twice as fast.
First, open the furnace GUI.

Fill the top slot with the iron you wish to smelt.

Then place your form of fuel (in this case, coal) into the bottom slot.
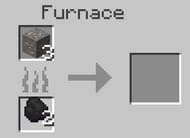
Wait for the progress bar to fill, then collect your iron.
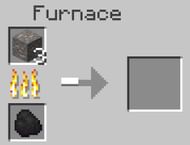
Once you have all 31 pieces of your iron ore smelted into iron ingots, you can proceed to making your anvil.
To make an anvil, place down your crafting table and open up the crafting GUI.

Since this recipe requires 3 iron blocks, you must first fill the crafting table completely with iron ingots three times to make 3 iron blocks.
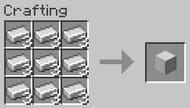
Now that you have your iron blocks, place them along the top of the row of the crafting table. Then fill in the center spot of the second row with an iron ingot, and finally fill the entire last row with iron ingots. It should look as shown below.
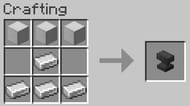
Now you have an anvil!
Give command for an Anvil: /give @p minecraft:anvil 1
Anvils have so many purposes. For example, anvils are currently the only way to combine enchanted books with tools or weapons. They are also great for combining enchanted weapons to fix durability, converting enchantments from multiple weapons onto one overpowered tool, naming things, and keeping your materials up to scratch by keeping their durability as high as possible.
Unfortunately, there is no way to repair an anvil. Since anvils get damaged over time through excessive use or from fall damage, it’s always a good idea to keep the anvil crafting recipe on hand as you may need to make a new one once you have broken your first.
Congratulations! You have now succeeded in making an anvil! Anvils are really useful when it comes to progressing later-game as they can be used in a multitude of ways, from adding enchanted books onto tools, armor, and weapons, all the way to naming nametags and different objects around your base. Anvils, although pricey to make, are completely worth it and should be used frequently when players are trying to get the best armor and weapons they can.