Roronoa Zoro, better known as the “Pirate Hunter Zoro” is a fighter of the Straw Hat Pirates, and a Senior Officer of the Straw Hat Grand Fleet. Zoro is the first crew member to join the Straw Hat Pirates, and is a right-hand man to Luffy. He is one of the Straw Hats' top four fighters by strength. He hails from the Shimotsuki Village at East Blue.
When Zoro was 8 years old, his mother had already passed away from illness. His father had already been murdered in a battle against pirates threatening the Village, leaving Zoro alone in a dojo in Shimotsuki Village where he learned how to use a sword.
He promised his late childhood companion Kuina that he would one day become the finest swordsman in the world, and he developed the Three Sword Style while receiving early training in Shimotsuki Village. Today, he is a master of it.
Name | Roronoa Zoro |
Epithet | Pirate Hunter Zoro |
First Appearance | One Piece Episode 1: I'm Luffy! The Man Who Will Become the Pirate King! |
Japanese Voice Actor | Kazuya Nakai Megumi Urawa (Young) |
English Voice Actor | Christopher R. Sabat Brina Palencia (Young) |
Gender | Male |
DOB | 11th November |
Age | 19 (debut) 21 (after timeskip) |
Status | Alive |
Origin | East Blue |
Affiliations | Straw Hat Pirates Straw Hat Grand Fleet Shimotsuki Family (Descended) Ninja-Pirate-Mink-Samurai Alliance (Disbanded) |
Occupation | Master Swordsman Pirate Rōnin (temporary) Bounty Hunter (former) |
Bounty | 1,111,000,000 Berries |
Zoro was born in the East Blue to Tera and Roronoa Arashi, a descendant of the Shimotsuki Family. By age 8, he was orphaned after his father died in battle and his mother passed from illness. He trained at the village dojo to become a swordsman.
Even as a child, Zoro was strong but could never defeat Kuina, the dojo master's daughter. Her grandfather, Shimotsuki Kouzaburou, gave Zoro a pair of swords to help him train. Curious about swordsmanship, Zoro asked Koushirou if swordsmen could cut through anything. Koushirou explained that true swordsmanship lies in understanding what to cut and what to protect, but Zoro was more focused on mastering the ability to cut through anything.
At 10 years old, after losing his 2000th match to Kuina, Zoro challenged her to a duel with real swords. He lost again and shared his dream of becoming the world's greatest swordsman.
Kuina revealed she had the same dream but believed she could never achieve it because she was a girl. Frustrated, Zoro told her he would surpass her based on skill, not gender. They then made a promise—one of them had to become the world’s best swordsman.
The next day, Kuina died after falling down the dojo stairs, leaving Zoro devastated. Determined to fulfill their promise, he asked Koushirou for her sword, Wado Ichimonji, and began developing his Three Sword Style, wielding two swords in his hands and Kuina’s in his mouth.
Zoro then set out to find Dracule Mihawk, the world’s greatest swordsman, but got lost and couldn’t return home. To survive, he became a bounty hunter, earning a reputation as the "Pirate Hunter" of the East Blue. His fame even reached the Grand Line, where Baroque Works tried to recruit him. He refused unless he could be the leader, leading to a fight where he killed their agent, Mr. 7.
During his journey, Zoro met bounty hunters Johnny and Yosaku. He later arrived in Shells Town, where he saved a girl named Rika by killing Helmeppo’s pet wolf. As a result, Helmeppo tricked Zoro into agreeing to be tied to a pole for a month in exchange for amnesty.
On the ninth day of Zoro's restraint, Monkey D. Luffy and Koby arrived in Shells Town. They found Zoro tied up and saw Rika trying to feed him onigiri, which Helmeppo cruelly stomped on. Zoro refused Luffy’s offer to join his crew but asked him to feed him the dirtied food, showing his kindness. Later, Rika told Luffy why Zoro was captured, strengthening Luffy's resolve to recruit him. When Helmeppo revealed Zoro would be executed in three days, Luffy punched him and set out to free Zoro.
Luffy stormed the Marine base, destroyed Morgan’s statue, and forced Helmeppo to show him where Zoro’s swords were. Meanwhile, Koby tried to untie Zoro. Luffy returned just in time to save them from a firing squad. Zoro, refusing to die, accepted Luffy’s offer and revealed his dream of becoming the world’s greatest swordsman. Luffy supported him, believing the Pirate King should have the best swordsman in his crew.
Luffy fought Morgan while Zoro defeated him. The Marines, relieved to be free from their tyrannical captain, let Luffy and Zoro go but asked them to leave the island. To protect Koby’s dream of becoming a Marine, Luffy picked a fake fight with him, giving Koby the courage to ask for enlistment, which was granted. As Luffy and Zoro left, Koby and the Marines saluted them, and the duo sailed off to their next adventure.
After leaving Shells Town, Luffy and Zoro realized they needed a navigator. While searching, Luffy got his head stuck in a giant bird's beak, forcing Zoro to paddle after him. Along the way, Zoro rescued three stranded pirates, who turned out to be Buggy the Clown’s men and planned to attack him. Once they realized who he was, they tried to escape, causing Zoro to lose track of Luffy.
In Orange Town, Luffy was tricked and trapped in a cage by Nami. Zoro arrived just in time to save them from Buggy’s crew. He seemingly sliced Buggy apart, only to learn that Buggy’s Devil Fruit powers made him immune to blades. Buggy then stabbed Zoro from behind, severely injuring him. Despite his wound, Zoro flipped a cannon aimed at Luffy and fired it at Buggy’s crew before carrying Luffy away in the cage.
After being taken in by Mayor Boodle, Zoro rested, but Buggy soon attacked with his destructive Buggy Balls. Emerging from the rubble unharmed, Zoro faced Cabaji, Buggy’s chief of staff. Cabaji fought dirty, targeting Zoro’s wounds and using fire attacks.
To level the playing field, Zoro cut his own side, proving his determination. Declaring that he would defeat any swordsman in his path, Zoro used his “Oni Giri” attack to defeat Cabaji before collapsing from exhaustion.
As the town celebrated Buggy’s defeat, Luffy, Zoro, and Nami were chased out by the townspeople, who mistook them for troublemakers. Thanks to the dog Shushu’s help, they escaped. Nami agreed to temporarily join them, and the three set sail together.
After leaving Treasure Island, the crew arrived at Syrup Village on the Gecko Islands. There, they met Usopp, the local prankster and leader of the Usopp Pirates. Usopp’s wealthy friend, Kaya, was sick but cared for by her butlers, Merry and Klahadore. Luffy hoped Kaya could give them a ship, so they visited her. However, an argument with Klahadore, who insulted Usopp’s father, led to them being thrown out.
While Usopp and Luffy bonded, Nami and Zoro encountered Jango, a hypnotist. Usopp soon rushed back, claiming that Klahadore was actually the pirate Captain Kuro, plotting to kill Kaya for her fortune. Though Usopp tried warning the village, no one believed him. Determined to protect Kaya, Usopp and the Straw Hats prepared to fight Kuro’s crew. Their ambush plan failed due to being on the wrong side of the island, forcing Usopp and Nami to fight alone. Just as they were about to lose, Luffy and Zoro arrived.
Jango hypnotized Kuro’s crew to boost their strength but accidentally put Luffy to sleep as well. He then summoned the Nyaban Brothers, Sham and Buchi, to fight Zoro. At a disadvantage with only one sword, Zoro struggled but managed to hold his ground. Nami recovered Zoro’s swords, allowing him to defeat the brothers. However, Buchi was hypnotized again, making him even stronger and injuring Zoro further. Meanwhile, Nami woke Luffy up by stepping on his face, just in time for him to stop Jango’s attack.
Kaya and the Usopp Pirates tried to escape, but Jango caught up and overpowered them. Kaya threatened to take her own life to protect the boys, forcing Jango to demand she sign over her wealth instead. Zoro and Usopp arrived just in time, with Usopp using his sniper skills to help defeat Jango and save Kaya.
Afterward, Usopp decided to keep the pirate attack a secret to protect the village’s peace. Grateful, Kaya gifted the Straw Hats a ship, the Going Merry. Usopp initially planned to leave on his own, but Luffy and the others simply told him to get on board, making him their newest crewmember.
The crew met Johnny and Yosaku, Zoro’s old bounty hunter friends, and set sail for the Baratie to find a cook. Luffy started working as a chore boy to repay the damage he caused to the restaurant while trying to convince Sanji to join his crew.
Gin, a pirate Luffy had previously spared, returned with his starving captain, Don Krieg. Sanji gave them food, but Krieg betrayed him, attacking the Baratie. It was then revealed that the head chef, Zeff, was once a great pirate known as Red-Leg Zeff, who had traveled the Grand Line for a year.
Gin explained how Krieg’s fleet was wiped out in the Grand Line by Dracule Mihawk. Just then, Mihawk arrived to finish the job. Seeing his chance, Zoro challenged Mihawk to a duel. Mihawk easily blocked Zoro’s attacks using only a small dagger, but after recognizing Zoro’s determination, he drew his black sword. Zoro unleashed his strongest technique, but Mihawk defeated him, shattering two of his swords.
Rather than retreat, Zoro turned to face Mihawk, stating that a scar on the back would be a shame for a swordsman. Mihawk acknowledged his resolve and slashed him across the chest, ending the fight.
Mihawk left after the duel, and Don Krieg continued his attack on the Baratie. Meanwhile, Johnny and Yosaku took Usopp and the injured Zoro to chase after Nami, who had stolen their ship and left.
After Yosaku left to inform Luffy about Nami’s location, Usopp, Zoro, and Johnny arrived at the island. To keep Zoro from rushing into battle, they tied him up, but when three fish-men appeared, Usopp and Johnny abandoned ship, leaving Zoro defenseless.
Zoro was taken to Arlong Park, where he learned that Nami was working for Arlong. To test her loyalty, he threw himself into the water. Nami saved him but hit him to maintain her cover. While Arlong was away, Nami secretly freed Zoro, who then fought off some fish-men. He later ran into Hatchan, who, unaware of the situation, took him to Cocoyasi Village. There, Zoro realized Arlong had already returned to Arlong Park.
Meanwhile, Luffy, Sanji, and Yosaku arrived, crashing onto the island with the sea cow Momoo. Johnny found them and told them he saw Nami stab Usopp. They confronted Nami, but she insisted she was only after money and told them to leave. Luffy refused. Later, Nami’s sister, Nojiko, explained that Nami was working for Arlong to buy back their village, revealing that Arlong had killed their adoptive mother, Bell-mère.
When Arlong’s ally, Marine Captain Nezumi, took all of Nami’s saved money, she broke down and begged Luffy for help. The Straw Hats then stormed Arlong Park, defeating most of the fish-men. Luffy got thrown into the water by Arlong, forcing Zoro and Sanji to strategize. Despite his injuries, Zoro fought Hatchan, defeating him with borrowed swords. Sanji beat Kuroobi, and Usopp took down Chew.
Sanji and Zoro attempted to fight Arlong but were overpowered. While Zoro kept Arlong distracted, Sanji freed Luffy from underwater. Arlong then ripped off Zoro’s bandages, worsening his wounds. Just as things looked bad, Luffy returned, swapped places with Zoro, and took on Arlong. Luffy destroyed Arlong Park, defeating him.
Zoro woke up in time to help beat Nezumi, who tried to take credit for Arlong’s defeat. Nami forced Nezumi to return the stolen money. Furious, Nezumi reported Luffy to the Marines, leading to his first bounty. After celebrating with the villagers, Nami rejoined the crew, and the Straw Hats set sail for their next adventure.
After Luffy defeated Buggy, Krieg, and Arlong, the Marines issued his first bounty. While Luffy, Usopp, and Sanji discussed his wanted poster, Zoro spotted an island. Nami explained it was Loguetown, where the Pirate King, Gold Roger, was born and executed.
Upon arriving, Zoro wanted to buy new swords and asked Nami for money. While walking through town, he saw Tashigi, a Marine swordswoman who looked just like Kuina, defeating some pirates. Later, in a weapons shop, the owner, Ipponmatsu, tried to trick Zoro into selling Wado Ichimonji for cheap, but Tashigi unknowingly ruined his scheme. Zoro then came across a cursed sword, Sandai Kitetsu.
Curious, Zoro tested the sword’s curse by throwing it into the air and holding out his arm. The blade spun around him without cutting him, proving his luck. Impressed, the owner gifted Zoro another sword, Yubashiri.
Zoro then rejoined the crew, except for Luffy, who had gotten into trouble. He and Sanji rushed to the execution platform, fighting off Buggy’s crew to save Luffy. Just as Buggy was about to execute Luffy, lightning struck the platform, saving him.
As they escaped to their ship, Smoker and Tashigi blocked their path. Zoro fought and defeated Tashigi, while Smoker battled Luffy. Before Smoker could capture Luffy, a mysterious man named Dragon intervened, allowing the Straw Hats to escape. With Loguetown behind them, the crew set sail for the Grand Line, ready for their next adventure.
As the Straw Hat Pirates prepared to enter the Grand Line, Nami explained that the only way there was through Reverse Mountain.
They sailed into a storm and nearly drifted into the Calm Belt but managed to reach the entrance of Reverse Mountain. Despite some close calls, they climbed the uphill rapids and made it down the other side. Suddenly, they heard a noise and saw a massive whale blocking their path. The whale nearly crushed the Going Merry, and Luffy, angry that the ship's bow was broken, attacked it. The whale then swallowed the crew, except for Luffy, who landed on its back.
Inside the whale, the crew found a strange setting with a house in the middle of the water. There, they met an old man named Crocus, who explained that the whale, Laboon, had been ramming into the mountain for years, hoping to reunite with a crew that left him behind 50 years ago. Meanwhile, two mysterious people, Mr. 9 and Miss Wednesday, tried to kill Laboon for food but were knocked out by Luffy.
After leaving the whale, Luffy made a promise to Laboon to settle his past troubles. As the crew prepared for their journey, Nami noticed their compass didn’t work. Crocus explained they needed a Log Pose to navigate the Grand Line and gave them one. Mr. 9 and Miss Wednesday then asked for a ride to their town. With everything set, the Straw Hats set sail to their next adventure.
As the Straw Hats sailed through the Grand Line, they faced rapid weather changes. While the crew worked hard to keep the ship steady, Zoro slept through it all. When the storm passed, he woke up and scolded the others for being lazy. He then noticed Miss Wednesday and Mr. 9 on board but was interrupted by Nami, who hit him for sleeping. When they spotted Whisky Peak, Luffy suggested stopping there, and Zoro agreed.
At Whisky Peak, the townspeople welcomed the crew and threw a big party. Zoro drank with them but later revealed that the town was actually a base for bounty hunters working for Baroque Works. He easily defeated them despite being outnumbered 100 to 1. Mr. 8, the leader, ordered an attack, but Zoro skillfully dodged gunfire, used his new swords, and took down multiple enemies.
He tested Yubashiri and found it to be a light and excellent blade, while Sandai Kitetsu proved to be unpredictable, cutting through a stone axe with ease. Zoro avoided various traps, countered sneak attacks, and effortlessly defeated more bounty hunters, including Miss Monday. As Mr. 8 and the remaining agents tried to stop him, Zoro dealt with Mr. 9’s steel bats and Miss Wednesday’s dizzying dance before defeating them both.
When Miss Wednesday took a sleeping Luffy hostage, Zoro quickly overpowered them, using Luffy’s stomach to launch himself at Mr. 8 and finishing the fight. With the bounty hunters defeated, Zoro was finally done.
After defeating Mr. 8 and Miss Monday, Zoro relaxed with a drink but soon heard a commotion. Mr. 5 and Miss Valentine arrived, taking down Mr. 9. Igaram begged Zoro to protect Princess Vivi, who was disguised as Miss Wednesday, from them.
Nami struck a deal with Igaram for 1,000,000,000 berries to take Vivi to Arabasta. She ordered Zoro to fight, and after some arguing, he reluctantly agreed. Zoro saved Vivi by cutting Mr. 5’s explosive attack in half, but she thought he was still after her. He assured her he was there to help, but before he could fight, Luffy appeared, furious at Zoro for attacking the townspeople.
Luffy, thinking the people were kind, attacked Zoro before he could explain. Realizing Luffy was serious, Zoro fought back, matching his attacks. In the middle of their fight, they scared off Mr. 5 and Miss Valentine, then defeated them easily. Nami stopped their battle by beating both of them up for nearly ruining her deal.
Vivi revealed the truth about Arabasta and Baroque Works, accidentally mentioning that Mr. 0 was Crocodile. Zoro and Luffy were excited to face a Warlord of the Sea. Igaram set off as a decoy but was suddenly attacked, his ship exploding in front of them. Seeing that the Log Pose was ready, Zoro told Luffy to gather the crew, and they set sail.
Onboard, Zoro was surprised when Miss All Sunday suddenly appeared on their ship. He drew his sword, but stopped when Usopp and Sanji also aimed at her. She effortlessly tossed them aside, making Zoro suspect she had a Devil Fruit ability. She offered an Eternal Pose to avoid Baroque Works, but Luffy destroyed it. As she left, Zoro noted how unpredictable their captain was.
On the prehistoric island of Little Garden, Zoro and Sanji competed to bring back the biggest piece of meat. Meanwhile, Baroque Works agents ambushed the crew, capturing Zoro, Nami, Vivi, and Brogy. Mr. 3 began turning them into wax statues. Deciding to die with honor, Zoro prepared to cut off his own feet, but Luffy arrived just in time.
Luffy’s attempt to save them sped up the waxing process, so Zoro struck a dramatic pose, ready to go out with style. Miss Goldenweek interfered with her ability, but Usopp freed Luffy by burning his shirt. With help from Karoo and even Mr. 3, they rescued Zoro, Vivi, and Nami. Zoro later saved Usopp from Mr. 5 while Luffy and Karoo chased after Mr. 3. After defeating their enemies, the crew escaped Little Garden and set sail for Arabasta.
While at sea, Nami fell sick. Zoro helped navigate and trained daily. When a cyclone hit, Nami helped steer, pushing herself too hard. The crew headed for a nearby island and encountered Wapol, whom Luffy quickly sent flying. At the island, they were attacked but later gained the locals' trust. Zoro and Karoo stayed behind to guard the ship, and Zoro trained in the freezing water.
Later, Vivi and Usopp found Zoro buried in snow after an avalanche. He claimed he had been training but couldn’t escape. Back in town, Zoro helped fight the king’s army to save Dalton, then joined the villagers in climbing to the castle. They arrived just as Luffy defeated Wapol.
Chopper decided to join the crew, and Dr. Kureha sent them off with sakura-like snow as a farewell. Before leaving, they found Karoo frozen in the water—he had jumped in to save Zoro, who had vanished while training. An angry Nami blamed Zoro and hit him on the head.
The crew, starving, tried to fish when they met Mr. 2 Bon Kurei, who showed off his Devil Fruit ability. After he left, they saw a Sea Cat and tried to catch it, but Vivi stopped them, explaining it was sacred. Learning about Mr. 2's powers, they marked an "X" on their arms to recognize each other.
Upon arriving in Nanohana, they encountered Smoker and Tashigi. Luffy’s older brother, Portgas D. Ace, appeared and fought Smoker while the crew escaped. Ace helped Luffy defeat Baroque Works agents, then gave him a mysterious piece of paper before leaving. The crew learned the Rebel Army had moved to Katorea, and Koza was ready to attack. They set off for Rainbase to confront Crocodile but ran into Smoker and Tashigi again.
Luffy, Zoro, Nami, Usopp, and Smoker were trapped by Crocodile. Chopper distracted him while Sanji freed the crew, but they were trapped again. Escaping by swimming, Zoro carried Smoker, later telling him he only did it because Luffy ordered him to. The crew then crossed the desert to Alubarna for the final battle while Luffy stayed to fight Crocodile.
Reaching Alubarna, they split up to fight Baroque Works. Zoro faced Mr. 1, whose steel body was nearly impossible to cut. Near death, Zoro unlocked the ability to "hear the breath of all things" and defeated Mr. 1 by cutting steel. Meanwhile, Vivi found a bomb hidden in a clock tower. Though she defeated its guards, she couldn’t stop the timer. Pell then carried the bomb into the sky, seemingly sacrificing himself to save Alubarna.
After the battle, Igaram proved Cobra's innocence, and Koza explained everything. Luffy recovered, and the crew celebrated with a banquet and a palace hot spring. Zoro gained a Beli60,000,000 bounty. Vivi decided not to continue with the crew, and as a farewell, the Straw Hats showed their "X" marks to symbolize their friendship.
As the Marines chased them, Bon Kurei and his crew helped them escape. Later, Nico Robin (Miss All Sunday) appeared on their ship and convinced them to let her join—though Zoro remained suspicious.
Nami's Log Pose pointed to the sky, and soon after, a 200-year-old galleon fell from above. While exploring it, the crew found a map of Skypiea. Competing with Masira’s salvage crew, they searched for more clues before heading to Jaya for information.
Jaya's main town was filled with brawling pirates. Luffy and Zoro encountered Bellamy the Hyena, who mocked their dreams and beat them up. Following Luffy’s orders, Zoro did not fight back. They also met a mysterious man who was later revealed to be Blackbeard. Leaving Mock Town, they clashed with Masira’s brother, Shoujou.
The crew then met Mont Blanc Cricket, a descendant of the infamous "liar" Mont Blanc Noland. Cricket, searching for the legendary golden city, explained how they could reach Skypiea using the Knock Up Stream. To find the right location, they needed a South Bird. While searching, Bellamy attacked Cricket’s home and stole his gold artifacts.
When Luffy saw what happened, he returned to Mock Town and knocked out Bellamy in one punch, reclaiming Cricket’s belongings. Meanwhile, Masira and Shoujou upgraded the Going Merry for flight. Before their ascent, Blackbeard and his crew appeared, revealing Luffy and Zoro’s new bounties. Zoro was pleased to be officially wanted. Blackbeard tried to capture them but missed as the crew rode the Knock Up Stream into the sky, arriving in the sea above the clouds.
The Straw Hats arrived in the sky and were greeted by a Watcher who first demanded a fee but then let them pass for free. Landing on a cloud beach, they met a Skypiean girl and her father, who introduced them to Dials.
Soon, the White Berets, Skypiea’s police, arrived and accused them of illegal entry. Unable to pay the massive fine, the crew was sentenced to a "Death Penalty." Luffy, Zoro, and Sanji quickly defeated the White Berets.
As they prepared to explore, a giant shrimp took the Going Merry away with most of the crew on board. A Skypiean man warned Luffy, Sanji, and Usopp that their friends had been taken to the Sacrificial Altar, where the powerful "God" Enel resided. Meanwhile, Zoro, Nami, and Robin ventured into the forest, brushing off Chopper's concerns about "God." Eventually, the crew reunited at the ship, and Zoro helped Sanji prepare food.
The next day, the crew split into two teams. Zoro, Chopper, Luffy, and Robin encountered a giant snake, which separated them. Zoro faced Braham, a Shandia warrior who used Dials and pistols. After an intense fight, Zoro defeated him with Sanjuroku Pound Ho.
While eating, Zoro was suddenly carried away by a South Bird and dropped into a battle between Wyper and Ohm, a Priest of Skypiea. Ohm’s sword had a Dial-powered hilt that could change shape, making it difficult to cut. After a fierce fight, Zoro defeated Ohm with Hyakuhachi Pound Ho. Shortly after, Enel used his lightning powers, knocking Zoro down into the ruins where Enel, Wyper, Gan Fall, Nami, and Robin were.
Enel predicted that only five people, including himself, would survive and invited Zoro, Robin, and Wyper to join him while planning to eliminate Nami. They all refused, declaring that Enel would be the one to fall. Enel swiftly knocked out Gan Fall, injured Robin, and electrocuted Zoro when he tried to fight back.
Regaining consciousness, Zoro attempted to cut down the giant beanstalk to help Luffy fight Enel. He managed to slice part of it before Enel struck him unconscious again. Wyper finished the job, sending Enel’s battlefield crashing down.
After Luffy defeated Enel and rang the Golden Belfry Bell, the Straw Hats joined the Skypieans in a grand celebration.
After returning from Skypiea, the Straw Hats encountered a mysterious pirate ship with no captain or navigator while escaping a giant wave. They soon landed on Long Ring Long Land, a strange island with unusually long animals. While exploring, they were challenged by the Foxy Pirates to a Davy Back Fight, a pirate game where crew members could be taken from the losing side. Luffy accepted the challenge.
In the first round, the "Donut Race," the Straw Hats lost, and Foxy took Chopper. Chopper was devastated, but Zoro reminded him that he chose to be a pirate and had to accept the consequences.
In the second game, "Groggy Ring," Zoro and Sanji were forced to work together despite their constant bickering. Since weapons were not allowed, Zoro fought using his No Sword Style. After a tough battle, they won and reclaimed Chopper.
The final event, "Combat," was a one-on-one fight between Luffy and Foxy. Luffy won and chose to take Foxy’s pirate flag instead of a crew member. He then drew them a new flag, which turned out terrible due to his poor drawing skills.
Back at Tonjit’s hut, the crew encountered Marine Admiral Aokiji. He was there to confirm Robin’s survival. Without warning, he used his Ice Saber to attack, freezing Robin. Zoro tried to stop him but got his shoulder frozen in the process.
After escaping to the ship, Chopper told Zoro and Sanji that jumping into the ocean would unfreeze them, so they immediately dove in. Later, Zoro reflected on the fight and realized that Luffy needed to become stronger to face even more powerful enemies.
As the Straw Hats continued their journey, they spotted a sea train and stopped at a nearby station. An old woman named Kokoro told them to seek out Iceburg in Water 7 for ship repairs and a shipwright. When they arrived, Luffy, Nami, and Usopp went to find a shipwright while Robin and Chopper explored the city. Sanji followed later, while Zoro stayed on the ship.
While Zoro was resting, the Franky Family attacked the ship but were easily defeated. A shipwright named Kaku from the Galley-La Company arrived to inspect the Going Merry and declared it beyond repair. Zoro refused to believe it but later reflected on whether this would be the ship’s final journey.
Later, Zoro joined Luffy, Sanji, and Chopper to rescue Usopp, who had been beaten and robbed by the Franky Family. They destroyed their base, but the stolen money was already gone. When Usopp recovered, Luffy told him they needed a new ship, leading to a heated argument. Usopp quit the crew and challenged Luffy to a duel for ownership of the Going Merry. After losing, Usopp walked away, leaving the crew heartbroken.
Meanwhile, Robin had mysteriously disappeared. The crew was soon framed for an assassination attempt on Iceburg. They sneaked into Galley-La’s headquarters and discovered that Iceburg’s attackers were actually CP9 agents disguised as shipwrights, including Kaku and Lucci. Robin was with them, shocking the crew. Zoro attacked Kaku, but Lucci easily overpowered him and sent him flying into a chimney, where he got stuck.
Chopper later found Zoro and helped free him just as a massive storm, Aqua Laguna, approached. They barely escaped with the help of Paulie. After learning that Robin had been taken against her will, they decided to rescue her. Kokoro revealed another sea train, Rocketman, which they could use to chase CP9. The Franky Family also joined them to rescue their captured leader.
Riding the Rocketman, the group encountered a massive tidal wave. Zoro and Luffy used a combined attack to punch through it, creating a path. Along the way, Zoro defeated Marine Captain T Bone, clearing the tracks. They also reunited with Sanji and Sogeking (Usopp in disguise). As they neared Enies Lobby, Paulie explained their attack plan, but Luffy ignored it and launched himself straight into the enemy stronghold before the train even stopped.
As the Straw Hats, Franky Family, and Galley-La arrived at Enies Lobby, they planned their attack. However, Luffy rushed in ahead on his own. While waiting to enter, Zoro was asked to cut the fence, but instead, he had Yokozuna push it back, using it as a ramp for the Rocketman to launch into Enies Lobby. They landed on a giant named Oimo and began their mission to rescue Robin.
The crew lined up on a rooftop, pleading with Robin to let them save her. When they realized the bridge wouldn’t be lowered, Kokoro used the Rocketman to launch them across to the Tower of Justice, with Luffy holding everyone together.
Once inside, CP9 agent Fukurou revealed that Robin’s handcuffs required a key. The crew split up to fight CP9 members and find the right key. Zoro faced Kaku again, who had grown stronger. After an intense battle, Zoro unlocked a new technique and defeated Kaku, securing key number five. Later, he and Sanji carried an injured Sogeking through an underwater tunnel but nearly drowned until Kokoro, revealed to be a mermaid, saved them.
While Luffy fought Rob Lucci, the rest of the crew battled Marines sent due to the accidental activation of a Buster Call. Zoro encountered a Marine named Shuu, whose Devil Fruit power rusted and destroyed Zoro’s sword, Yubashiri. Meanwhile, their escape ship was destroyed, leaving them stranded—until they heard the Going Merry’s voice. Trusting it, they jumped into the sea and miraculously landed on the Merry, which carried them away from Enies Lobby.
After escaping, the Merry suddenly began breaking apart. Iceburg and the Galley-La Company arrived just in time to rescue the crew. Realizing the Merry could no longer continue, Luffy gave it a Viking funeral, and the crew tearfully said their final goodbyes.
Two days after escaping Enies Lobby, Zoro sat staring at his broken sword, unsure of what to do. When he heard the Marines were coming, he rushed to warn the crew but got lost along the way. Upon arriving, he quickly defeated Chief Petty Officer Helmeppo and learned that the Marines were led by Luffy’s grandfather, Monkey D. Garp. He also reunited with Koby.
Later, Zoro tried to buy a new sword but had no money and was thrown out. His new bounty was revealed to be 120,000,000 Beli. When Luffy was about to invite Usopp back, Zoro firmly stated that Usopp had to apologize first, believing that Luffy, as captain, needed to stand strong.
Soon after, Zoro and Sanji informed the crew that Garp’s battleship was approaching. The Straw Hats then set sail on their new ship, the Thousand Sunny. When Usopp finally apologized, the crew happily welcomed him back, and Zoro was seen smiling.
While sailing on the Thousand Sunny, Zoro and the crew found a mysterious barrel. When they opened it, a flash shot into the sky, followed by a sudden storm. After surviving it, they came across a ghost ship belonging to Brook, a talking skeleton. Luffy invited him to join the crew, which surprised Zoro.
Soon, they reached Thriller Bark, an eerie island. After Nami, Usopp, and Chopper went missing, Zoro and the others went to find them but were stopped by an invisible force that stole one of his swords. The crew pressed on, encountering strange creatures like a Cerberus and a talking tree. Later, ghosts drained their morale, and zombies attacked them, but they managed to fight back.
Inside the mansion, Zoro disappeared and later woke up on the Sunny with Luffy and Sanji. He then helped Franky cross a bridge, only for it to be destroyed by Oars, a massive zombie controlled by Gecko Moria. Zoro later found Brook injured and saved him from Ryuma, a legendary samurai. After an intense duel, Zoro defeated Ryuma and claimed his sword, Shusui.
When Oars rampaged through Thriller Bark, Zoro attempted to fight him but was overpowered. He later joined the crew in attacking Oars, but Moria’s powers made Oars even stronger, knocking them all down. Eventually, Luffy defeated Moria, and the crew's shadows returned. However, Bartholomew Kuma then appeared, targeting Luffy.
Zoro fought Kuma but was completely outmatched. Kuma offered a deal—hand over Luffy, and the rest would be spared. Everyone refused, so Kuma unleashed a powerful Ursus Shock, knocking out almost everyone. However, Zoro stood up and landed a strong attack, revealing that Kuma was a cyborg. Zoro then made a desperate offer: he would take all of Luffy’s pain in exchange for his life.
Kuma extracted Luffy’s immense pain and let Zoro feel a small portion of it, nearly making him collapse. Still, Zoro insisted and absorbed all of it, enduring unimaginable agony. Later, Sanji found him covered in blood, but when asked what happened, Zoro simply replied, “Nothing happened.”
After recovering, Zoro placed his broken Yubashiri near the grave of Brook’s former crew, the Rumbar Pirates. Finally, as the Straw Hats left Thriller Bark, they raised a toast to their newest crewmate, Brook.
As the Straw Hats continued their journey, Zoro helped fight the Flying Fish Riders to protect Hatchan from the slave trader Duval. Afterward, they arrived at Sabaody Archipelago, where Zoro wandered off alone, got lost, and unknowingly insulted a World Noble. Before he could retaliate, Jewelry Bonney stopped him to avoid provoking an Admiral. Zoro then carried an injured civilian to safety before reuniting with his crew.
Zoro later crashed into the Human Auctioning House with Luffy and the others, where he witnessed Hatchan being shot. Luffy punched Saint Charlos, the same noble Zoro nearly attacked. As chaos erupted, they met Silvers Rayleigh, who used Haki to knock out the guards. Zoro helped fight off the Marines and escaped with Rayleigh’s help.
At Shakky's Rip-off Bar, Rayleigh revealed that he was Gold Roger’s first mate and shared stories about Roger’s past. He promised to coat the Thousand Sunny in three days and gave the crew Vivre Cards to regroup later. Zoro suggested they split up to avoid Marine detection.
Before they could hide, they were attacked by what seemed to be Bartholomew Kuma. Zoro, Luffy, and Sanji fought back, but Zoro noticed something was off about him. Despite their combined attack, Zoro collapsed from the lingering pain of taking Luffy’s injuries at Thriller Bark. Still, he managed to damage Kuma’s clone before Luffy finished it off.
As they recovered, Sentomaru and another Pacifista arrived, forcing them to fight again. While escaping with Usopp and Brook, they were ambushed by Admiral Kizaru, who nearly killed Zoro. Rayleigh intervened just in time to save him. Even with Sanji's help, they were overwhelmed by the Pacifista.
The real Kuma then appeared and stopped the fight. He briefly spoke to Zoro before making him vanish with a single touch.
Zoro was sent to Kuraigana Island in the Grand Line, landing in the ruins of the Shikkearu Kingdom, where Perona had also ended up. He woke up to find himself heavily bandaged by Perona, who refused to return his swords. Eventually, she gave them back, and as Zoro wandered through the ruins, she floated above him.
Soon after, he encountered a humandrill, a feral baboon skilled in swordsmanship after imitating soldiers from a war seven years ago. The island was also home to Dracule Mihawk, who returned to his castle and informed Zoro about the events at Marineford. Mihawk gave Zoro a small boat, but it was soon destroyed by the humandrills.
Later, Mihawk observed Zoro fighting the humandrills and remarked on their strength. He invited Zoro to stay at the castle, but Zoro refused, determined to reach the ocean. Meanwhile, Zoro made Perona hold up a newspaper, analyzing Luffy's actions at Marineford, suspecting a hidden message from Rayleigh.
Realizing the message meant the crew would reunite in two years, not three days, Zoro prostrated himself before Mihawk, asking to be trained. Mihawk initially refused, thinking Zoro was too weak to escape the island. However, after Zoro revealed he had already defeated the humandrills and needed Mihawk’s training to surpass him, the Warlord reconsidered and laughed at the bold request. He finally agreed, ordering Perona to tend to Zoro’s injuries before training began. Determined to become stronger, Zoro chose to train under the world’s greatest swordsman.
After two years of training, Zoro returned to Sabaody Archipelago with Perona's help. He was the first Straw Hat to arrive, as Shakuyaku informed him. While looking for something to do, he accidentally boarded a coated pirate ship instead of a fishing boat and fell asleep.
When the ship submerged, he woke up and sliced it in half, similar to Mihawk. When the wreck surfaced, Sanji found him sitting on a mast, casually admitting he had boarded the wrong ship.
Zoro and Sanji reunited and began their usual bickering, with Zoro ranking Sanji #7 among the returning crew members, annoying him. After Franky called them, they learned the Straw Hats’ meeting spot was Grove 42. Hearing a commotion, they went to check and found Luffy fighting Marines and Pacifistas alongside the fake Straw Hat crew.
Zoro and Sanji quickly defeated a Pacifista and argued over who delivered the final blow. Zoro then ranked Luffy #9 before they all headed back to the Thousand Sunny.
On the way, they ran into Rayleigh, who heard Luffy declare his dream of becoming Pirate King. Zoro simply smiled. As they continued, Marines blocked their path, but Perona helped them escape with her Negative Hollows.
Annoyed by Zoro’s attitude, she scolded him for being ungrateful. With Chopper and a giant bird’s help, Zoro, Luffy, and Sanji finally returned to the ship, reunited with their crew, and set sail for Fish-Man Island.
As the crew admired the ocean, Zoro casually mentioned that he had already seen it when he accidentally boarded a coated pirate ship. Sanji scolded him for ruining the moment. Later, Zoro tried to catch a fish with his sword, but Usopp and Chopper stopped him. He then challenged Luffy to a fishing contest, only for both of them to be beaten down by the crew.
Soon, the Caribou Pirates approached, but their sea cow Momoo fled in fear upon seeing Nami, Sanji, and Luffy. Left behind, Caribou pleaded for mercy, claiming he wasn’t a pirate. The crew then sailed into the Downward Plume, where they encountered a Kraken.
Seeing the Kraken destroy Caribou’s ship, Zoro mockingly said the pirates looked like jellyfish. Along with Luffy and Sanji, he fought the Kraken underwater, slicing off one of its tentacles despite Luffy’s protest. They defeated the Kraken but got separated from the crew as the ship went down the current.
Luffy later tamed the Kraken, naming it Surume. Since Luffy and Sanji’s coatings popped, Zoro had to share his. They eventually found the Thousand Sunny just as Surume saved the crew from Wadatsumi. Soon after, an undersea volcano erupted, and Zoro wanted to cut falling rocks but was stopped by Robin, who warned about the water pressure. Thanks to Surume and Usopp’s Pop Greens, the crew escaped. Zoro smiled, impressed by Usopp’s strength.
As they neared Fish-Man Island, they encountered Hammond, who demanded they join the New Fish-Man Pirates or die. Luffy refused, and Franky activated Coup de Burst, launching the ship into Fish-Man Island’s bubble. The crew was separated when they crashed.
Zoro was found by King Neptune and taken to Ryugu Palace, where he started drinking despite the king suggesting he wait for his crew. Meanwhile, after mermaids mysteriously disappeared, palace guards suspected the Straw Hats and locked up Zoro.
When the guards tried to capture Usopp, Nami, and Brook, Zoro freed himself, intercepted King Neptune’s attack, and tied up the king, his ministers, and the guards. His crewmates scolded him for going overboard, but Zoro insisted they had to fight back. He then told them, "We need to leave Fish-Man Island."
The Neptune princes arrived but couldn’t enter the palace. Through Den Den Mushi, Fukaboshi agreed to let the Straw Hats leave peacefully in exchange for the palace’s freedom. Just then, Shirahoshi disappeared, and Hody Jones’ men invaded. When Usopp panicked, Zoro calmly said, "Cut them."
Zoro swiftly defeated the human pirates, though he was annoyed when the Minister of the Left said he was enjoying it. An unconscious pirate accidentally opened the Connection Corridor, allowing the New Fish-Man Pirates and Vander Decken IX to enter. When Decken realized Shirahoshi was gone, he left, leaving Hody Jones in charge.
Jones smashed a palace wall, flooding the area. He attacked, injuring King Neptune and his soldiers. Zoro countered with Yakkodori, but Jones used his own men as a shield. As the room filled with water, Zoro cut Neptune’s chains but knew the hostage negotiation was over. Before the palace was fully submerged, he told Neptune to save the crew and prepared to fight Hody Jones underwater.
Despite the disadvantage, Zoro landed a strong blow on Jones, who was briefly knocked out. Zoro surfaced for air and grabbed Neptune, who cleared a path for the palace guards to escape. However, Neptune’s back gave out, putting them in danger.
His whale, Hoe, arrived to help, but Jones, now enhanced by Energy Steroids, stopped Neptune with one hand. Zoro, Usopp, Brook, and Neptune were captured and locked in a flooding cage.
Brook then used his spirit form to escape, and Zoro told him to bring his swords. Once freed, Zoro and the others joined the battle at Gyoncorde Plaza.
As Zoro and Sanji prepared to fight, Luffy used Supreme King Haki, knocking out half the enemies. Zoro was impressed and joked that if Luffy couldn’t do that much, they’d need a new captain. During the battle, Zoro defeated the Iron Shell Squad and intercepted Dosun before he could attack Luffy.
Later, Zoro stopped Hyouzou, an octopus swordsman. Calling him a “warm-up,” Zoro easily broke his swords and mocked him, saying he wasn’t even strong enough to be entertaining. Hyouzou, angry, coated new swords in poison and attacked, but Zoro effortlessly cut him down, calling him a frog in a well.
After the New Fish-Man Pirates were defeated, the crew watched Luffy try to destroy Noah. When the Sea Kings stopped it, saving the island, Fish-Man Island celebrated their victory.
At the Thousand Sunny, Zoro commented on Chopper’s exhaustion and watched as he performed a blood transfusion for Luffy and Jinbe. Later, at Ryugu Palace, Zoro refused to be called a hero, joking that heroes have to share their drinks while he wanted to keep his. He enjoyed the banquet, drinking with Franky and Hatchan before falling asleep with Nami, Usopp, and Sanji.
Luffy woke him up, sensing an intruder—Caribou. Zoro and Sanji watched as Luffy easily defeated him. When a prison tower was found cut in half, Zoro let Caribou take the blame. Realizing Caribou stole the palace’s treasure, Nami ordered Zoro, Luffy, and Sanji to hunt him down.
They found Caribou already knocked out and took the treasure back to the palace. On the way, Zoro and Sanji bickered over directions. They encountered Big Mom’s messengers, Pekoms and Baron Tamago, and Zoro questioned Big Mom’s strength. He smirked as Luffy declared war on her.
After returning to the crew, Nami was furious that they gave the treasure to Big Mom, beating Zoro, Luffy, and Sanji. Soon after, the Straw Hats set sail for the New World.
At sea, Zoro suggested a celebration for their New World arrival. When a giant sea monster appeared, Zoro killed it with Sanbyakurokuju Pound Ho. As the ship got caught in a White Storm, a group of Island Whales (like Laboon) helped them find their way. After Brook played "Binks’ Sake", the whales guided the Sunny to the surface.
After entering the New World, the Straw Hats spot an island surrounded by flames. They receive a distress call from someone claiming a samurai is attacking them, but the message cuts off. Zoro asks Brook about samurai, and Brook explains they are warriors from Wano Country, which is closed off to outsiders.
The crew draw straws to form the landing party, and Zoro, Usopp, and Robin join Luffy in exploring the island. Nami creates a safe path over the flames, and the group eats the bentos Sanji made. Sanji had hidden razors and poison in Zoro’s meal, but Zoro eats it unfazed. He teases Usopp for being scared to eat.
Upon landing, they slash open a gate and enter the island. The heat forces them to strip down, and they discover a melted city that Robin identifies as a former government base. They also find a giant skull, proof of a past disaster.
Suddenly, they encounter a dragon, a creature Zoro once thought was a myth. The group fights the beast, and after Luffy and Usopp weaken it, Zoro cuts off its head. They then find talking dismembered legs attached to the dragon’s head, which begin running off toward a Warlord.
After cooking and eating the dragon, they continue exploring and discover the island is split into a hot and cold side by a lake. Usopp then spots a winged humanoid.
Brook calls, revealing that the Sunny was taken to the cold side, and the rest of the crew is missing. Luffy and Robin defeat two centaurs, and the group crosses the lake in Usopp’s Pop Green boat. Midway, a centaur calls his boss, warning that pirates are coming.
When they reach shore, centaurs mistake Zoro for the samurai who attacked them and fire bazookas, capsizing their boat. As Zoro tries to fight back, sharks drag him underwater. Before the centaurs can attack again, Brook arrives, buying time for the group to escape.
Emerging from the freezing water, they steal coats from the centaurs and ride Brownbeard to Vegapunk’s old research lab. There, they witness Law and Smoker’s battle.
After talking to Law, they escape the Marines and reunite with the rest of the Straw Hats and the rescued children. Taking shelter in the lab, they learn about Caesar Clown from Brownbeard.
When Kin’emon leaves to find his missing torso, Sanji (in Nami’s body) and Brook offer to help but clearly have perverted motives. Nami forces Zoro to go with them to keep them in check.
Zoro’s group follows the giant footprints of the Yeti Cool Brothers and encounters them at a cliffside. The brothers knock them out with bullets, sending them falling into an icicle trap, but Zoro destroys it before losing consciousness. Sanji later kicks Zoro and Brook awake, and they find Kin’emon frozen. They learn his torso is in the lake and set out to retrieve it.
As they near the lake, they spot Brownbeard’s men, who flee instead of fighting. Zoro notices a suspicious mountain, which turns out to be slime moving mysteriously. Brook recalls reading that this slime melts women’s clothes, but Zoro realizes it's toxic when fish start dying in the lake. As Sanji dives in for Kin’emon’s torso, Zoro and Brook try to fight off the slimes, but they release poison gas when attacked. Zoro suggests eating them instead, annoying Sanji.
Kin’emon eventually cuts through the slimes and fire using his Foxfire Style, impressing Zoro. The group flees as Smiley, the giant slime, starts changing. They decide to head to Caesar’s lab to find Momonosuke. Along the way, they spot a small dragon and a giant candy trap for Smiley. When Smiley explodes, releasing deadly poison, Zoro suggests riding the dragon to escape. Sanji, motivated by perversion, catches it, allowing them to fly away.
The group reunites with Nami, Usopp, and Brownbeard and heads toward Caesar’s lab. Zoro and Kin’emon slice open the iron shutter, letting them in but also allowing poison gas to leak inside. The G-5 Marines blame them and prepare to arrest the Straw Hats, but Law intervenes and reveals they have two hours to escape. The group splits up, with Zoro joining Kin’emon, Nami, Usopp, and Sanji. Usopp informs Zoro that Luffy was defeated by Caesar, and Zoro warns that they can’t lower their guard anymore in the New World.
When the Marines try to capture the Straw Hats, Zoro, Kin’emon, and Brook fend them off. However, Tashigi stops the fight and allows the Straw Hats to proceed. As gas enters Building A, Zoro’s group barely escapes to Building B.
While riding Brownbeard, they are attacked by a small dragon, which breathes fire. Zoro, unfazed, notes it’s faster than the previous dragon. After defeating it, they find Chopper in Monster Point, trying to stop the kidnapped children from eating drugged candy. The children overpower Chopper, and Zoro’s group rushes to help. They follow the children to the Biscuits Room, where they encounter Monet, a Logia-type snow woman.
When Monet stabs Robin, Zoro steps in to protect his crew. Monet blocks the exit, but Robin shatters her snow form, and Zoro cuts the barrier down, letting Nami, Robin, and Chopper escape. Monet notices that Zoro isn’t fighting seriously and wonders if she could defeat him.
As Sanji, Tashigi, and the G-5 Marines arrive, Zoro and Sanji briefly argue. Tashigi stays behind to fight Monet with Zoro, but criticizes him for holding back, thinking he’s being sexist. Annoyed, Zoro lets Tashigi fight alone. When Monet gains the upper hand, Zoro cuts her cheek with Haki, terrifying her. He then slices her in half, but without Haki, so she survives. Shaken by fear, Monet hesitates, allowing Tashigi to finish her off.
As poison gas spreads, Zoro carries Tashigi on his back despite her protests. She gets excited about his rare sword, but he tells her to stay quiet.
Finally, Zoro and the crew regroup with the Straw Hats, Marines, Law, Momonosuke, Brownbeard, and Kin’emon (now petrified by gas). They escape using a rail cart, and Zoro slashes falling debris to clear their path. Outside, they find Franky in General Franky, facing Doflamingo’s subordinates, Buffalo and Baby 5.
After defeating Buffalo and Baby 5 and capturing Caesar Clown, Zoro joins the celebratory feast. As Tashigi and her men escort the children away from Punk Hazard, the Straw Hats set sail with Law, Kin'emon, and Momonosuke.
While sailing to Dressrosa, Luffy reveals his alliance with Law to defeat a Four Emperor, which excites Zoro. Law then explains Doflamingo’s underworld ties and their plan to weaken Kaidou’s forces.
That evening, Kin’emon challenges Zoro, believing he stole Ryuma’s sword. Zoro defends himself, and the fight stops when Kin’emon gets distracted by his son bathing with Robin.
The next morning, the crew reads the news about Doflamingo resigning from the Seven Warlords and the new pirate alliances, including Luffy & Law’s alliance and the Kid-Hawkins-Apoo alliance.
After Law informed Doflamingo that they would bring Caesar to Green Bit, Zoro ate with the crew while Kin'emon and Momonosuke shared their story of being shipwrecked, drifting to Dressrosa, and getting separated. The Thousand Sunny then approached Dressrosa.
Upon arrival, the crew split into teams. Zoro joined the mission to destroy the SMILE Factory and rescue Kanjuro. While exploring Dressrosa in disguise, they stopped at a restaurant, where they saw thugs cheating a blind man. Luffy intervened, and the blind man used a strange gravity-like ability to deal with the thugs.
After the man left, a commotion broke out as people's belongings were mysteriously stolen. Zoro realized Shusui was missing and chased the thief with Sanji and Kin'emon. Though Zoro lost sight of the thief, he eventually caught up and retrieved his sword. He then met Wicca, a dwarf, who asked him to take her to the flower fields to report to her commander. She also warned him that the Donquixote Family was attacking the Thousand Sunny. Though Zoro wanted to rush back, Wicca insisted he take her to the flower fields first.
At the Riku Royal Army Headquarters, Zoro met Franky and the Thunder Soldier. While watching Luffy compete in the Corrida Colosseum on a video broadcast, he grew frustrated about missing out. He then remembered the Sunny was in danger and ran back with Wicca. Along the way, they met Sanji and Kin'emon, who told them about Giolla and Doflamingo’s strongest subordinates.
When Sanji left to save Nami’s group, Zoro and Kin'emon stayed behind at the colosseum, wondering how to get inside. Bartolomeo approached them, offering to help find Luffy in exchange for Zoro's autograph.
With Bartolomeo’s guidance, they reunited with Luffy. Zoro, still upset about missing the tournament, warned Luffy that the colosseum was surrounded by Marines. After a conference call with Sanji and Franky’s group, they learned the true situation in Dressrosa and agreed to join the revolution.
Suddenly, they witnessed Law and Doflamingo’s intense battle, which ended with Doflamingo shooting Law three times. Zoro and Kin'emon rushed in to save Law, but Zoro was intercepted by Issho, the blind gambler, who revealed himself as a Marine Admiral. Issho used his ability to push Zoro underground, but Zoro countered with a flying slash. As Doflamingo and Issho flew off with Law, Marines began pursuing Zoro and Kin'emon.
Hearing that the Sunny was under attack by Big Mom’s crew, Sanji's group left for Zou while Luffy, Zoro, and Kin'emon headed to the palace to rescue Law and fight Doflamingo. After escaping the colosseum in disguises, they met Viola, who offered to guide them. She led them through a secret passage, where Zoro suggested using a basket system to lift them to the palace.
At the palace rampart tower, Luffy smashed through the gate instead of sneaking in, forcing them to charge ahead. They were then confronted by Pica, who tried to crush them with his Devil Fruit powers. Luffy and Viola moved ahead while Zoro stayed behind to fight Pica.
As the battle unfolded, Pica suddenly disappeared. Zoro, now outside the outer wall tower, watched the chaos in Dressrosa and continued searching for Pica.
After Doflamingo trapped Dressrosa in his Birdcage and moved the royal palace to Flower Hill, he put a bounty on several people, including Zoro, who was worth 200 million Beli. Zoro reunited with Luffy and contacted Robin. When Luffy declared he would defeat Doflamingo, he grabbed Zoro and Law, and they headed toward him.
They jumped down from King’s Plateau, landing in a crowd of enemies. After fighting Senor Pink, Machvise, and Dellinger, Dressrosa’s citizens attacked them, followed by Issho. As Zoro clashed with Issho, Pica appeared as a massive stone giant.
When Luffy mocked Pica’s high-pitched voice, Pica attacked in rage. Luffy, Zoro, and Law were sent flying and landed near the Colosseum, where they met several allies, including Cavendish, Hajrudin, Elizabello II, and Orlumbus. Zoro commented on Luffy’s strange friends before they all charged toward the royal palace to fight Pica.
During the battle, Zoro clashed with Pica, warning others that attacking his stone body was useless. After Luffy shattered Pica’s head, Zoro spotted Pica’s real body and fought him head-on. As Pica tried to attack Robin’s group, Zoro blocked him and declared his goal of becoming the world’s greatest swordsman.
Despite Pica’s strong attacks, Zoro fought without much difficulty. When Pica tried to crush Riku Doldo III, Zoro had Orlumbus launch him into the air. Using Haki, Zoro sliced Pica’s massive stone form in half and cut down Pica’s real body in midair. Elizabello’s King Punch cleared the remaining debris.
After checking his sword for damage, Zoro was pulled up by Usopp and Kin’emon, but he told them to save their praise until the Birdcage was gone. When he heard about Law’s defeat, he grew worried as Torikago began shrinking.
Determined to buy time, Zoro, Kin’emon, and Kanjuro tried pushing back Torikago with their swords. Others joined in, and Zoro hoped Luffy would defeat Doflamingo soon. When Luffy recovered and delivered the final blow, Zoro smiled, watching the Birdcage collapse and Dressrosa celebrate Doflamingo’s defeat.
After Doflamingo’s defeat, Zoro and his group rested and recovered at Kyros' old house, where they listened to Sabo’s story. Before leaving, Sabo gave Zoro a Vivre Card for Luffy.
Three days later, while eating, they heard a rumor about Rebecca’s father. Bartolomeo then arrived, warning them that the Marines were mobilizing to capture the Straw Hats. As the Marines approached Kyros’ house, Zoro and the others fled.
They headed to the eastern port to wait for Luffy, but Issho appeared. When Issho tried to crush Luffy’s allies with rubble, they fled to their escape ship. Luffy arrived and attacked Issho, and Zoro prepared to fight, but Bartolomeo stopped him, saying it wasn’t the right time. They then escaped across a bridge while the citizens of Dressrosa pretended to chase them, buying them time.
The group reached Orlumbus' flagship, the Yonta Maria, where several new allies pledged loyalty to the Straw Hats, forming the Straw Hat Grand Fleet. When Luffy was asked to drink sake to seal the alliance, he declined, saying they were free to do what they wanted. Zoro drank from Luffy’s cup, surprising everyone. The Grand Fleet was officially formed, and they held a feast to celebrate their victory.
After the feast, the allies received Luffy’s Vivre Card and parted ways. Bartolomeo took the Straw Hats, the samurais, and Law aboard his ship, the Going Luffy-senpai. When Zoro saw his new bounty, he happily asked for alcohol to celebrate.
During a hailstorm, Zoro was shocked to learn that the Barto Club had no navigator and little sailing experience. Since they relied on a granny for advice, Zoro, the Straw Hats, samurais, and Law had to protect the ship. After one week of sailing, they finally reached Zou.
After finding the Thousand Sunny, the Barto Club bid them farewell. The group climbed the giant elephant’s leg using a dragon created by Kanjuro. The samurais revealed they were looking for a ninja comrade, Raizo, when suddenly, a monkey fell on Kin'emon and Kanjuro, knocking them off. The samurais assured the group they would catch up later, so the rest continued upward. At the top, the dragon disappeared, but Zoro and Law didn’t care.
In the village, Luffy ran ahead while the others explored. They found signs of a recent attack, and Zoro was suddenly attacked by Carrot, a rabbit mink. They clashed briefly before Wanda, a dog mink, stopped the fight. Zoro wondered what kind of weapon Carrot used, but Wanda and Carrot left quickly to deal with an intruder at Whale Forest. Before leaving, Wanda mentioned a "corpse" of their comrade, making the group worry, though they didn’t believe it. They continued exploring, finding more battle damage.
At Kurau City, they experienced eruption rain and took shelter. After the rain, they realized it was a daily occurrence. When Usopp spotted Luffy with Wanda and Carrot, Law teleported them nearby. Wanda then led them to Rightflank Fortress, where they reunited with Nami and Chopper.
During a feast with the Minks, Zoro was annoyed that they wanted to play with him. They then reunited with Brook, who confirmed Momonosuke was safe but warned them not to mention samurai or Wano Country. Before explaining why, canine minks interrupted. When Nami asked about Sanji, Zoro and Luffy weren’t too worried, which frustrated her. They then listened to Nami and Chopper’s story about escaping the Big Mom Pirates and Wanda’s story about how Nami’s group saved the Mink Tribe.
Later, they went to meet Duke Inuarashi, who had awakened from a coma. Wanda explained Jack’s attack on Zou, revealing that he was searching for Raizo. Brook then reminded everyone not to mention samurai. At the duke’s home, they met Shishilian, who thanked them. They also learned about a weapon Jack used against the Minks.
After hearing about Jack’s destruction and the Minks’ survival, the group decided to visit Nekomamushi and the Guardians at Whale Forest. When they learned about Sanji’s situation, Zoro seemed indifferent, which annoyed Chopper. He reminded them that destroying the SMILE Factory angered Kaidou, just like destroying the SAD Factory angered Doflamingo. He warned that Kaidou was targeting the samurai, and they should expect a battle with the Beast Pirates. Zoro and Nami then argued about Sanji leaving.
After Luffy decided to go after Sanji, they arrived at Whale Forest. Zoro listened as Pekoms explained Sanji’s predicament. Later, Luffy found Zoro sitting on a bench, assuming he was worried about Sanji, which annoyed him. Nekomamushi arrived and greeted them, and Zoro partied with his crew and the Heart Pirates.
The next morning, Zoro and his group heard a bell ringing and realized that Kin'emon and Kanjuro had arrived. Worried about how the Mink Tribe would react, they rushed to find them. They intercepted Kin'emon, Kanjuro, and Momonosuke just as they arrived at Kurau City, trying to keep them hidden.
However, as Nekomamushi and Inuarashi were fighting, the samurais revealed themselves. To everyone's shock, the Minks welcomed them and revealed that Raizo was safe. The Straw Hats were stunned to learn that the Minks had protected Raizo despite their suffering.
The crew was even more surprised when they learned that Momonosuke was not Kin'emon's son, but the heir to Kuri's daimyo. However, Zoro and Usopp were furious when Momonosuke hugged Nami, and she didn't mind because she realized his family was rich. The group was then led to Raizo’s hiding place, a secret cave inside the Whale Tree.
Robin deciphered a red poneglyph, and Inuarashi explained that there were four Road Poneglyphs that led to Laugh Tale. The crew was shocked to learn that Kaido and Big Mom each had one. They were even more surprised when Nekomamushi revealed that Momonosuke’s ancestors created the poneglyphs.
However, since Oden was executed by Kaido and the Wano shogun, Momonosuke never inherited their knowledge. When Zoro asked why Oden was killed, Kin'emon revealed that Oden had been on Roger’s crew and reached Laugh Tale, making him a target for the Beast Pirates.
Zoro finally understood why Kaido and Doflamingo were after the samurai, but they explained that Oden never revealed the world’s secret before he died. Zoro then watched as Luffy formed an alliance with the Minks and samurai to defeat Kaido and the Wano shogun.
After leaving the secret room, they learned that Inuarashi and Nekomamushi had traveled with Oden and had been on both Whitebeard and Roger’s ships. The alliance then split up to prepare for their mission in Wano.
However, before they could start, Zou began shaking, and they heard Zunesha crying. They then witnessed Luffy and Momonosuke hearing Zunesha’s voice. Momonosuke revealed that Jack had returned and was attacking. On Momonosuke’s command, Zunesha sank Jack’s fleet with one blow, ending the threat.
As the alliance prepared for their missions, Zoro decided to go with Kin’emon’s team. When the Sanji Retrieval Team left, everyone (except the remaining Straw Hats) was shocked when Luffy jumped off Zunesha with his group.
Upon arriving in Wano, Kin'emon told the Straw Hats and Heart Pirates to blend in while they searched for allies for the raid on Onigashima. Zoro took the name "Zorojuro" and roamed the Flower Capital as a ronin.
However, he was wrongly accused of murder and brought before Magistrate Toyama Tsujigiro, who ordered him to commit seppuku and took Shusui. Zoro then sensed blood on Tsujigiro, realizing he was the real killer. He cut him down with a flying slash, destroying much of the structure around him.
Now a wanted man, Zoro escaped the capital, living in the wastelands by hunting animals for food. One day, he saved a villager named Tsurujo from a group of Beasts Pirates. Soon after, he reunited with Luffy, but their moment was interrupted by Basil Hawkins and his men. During the battle, Zoro attacked Hawkins, but due to his Devil Fruit power, the damage was transferred to one of his subordinates. After getting struck by Hawkins' nails, Zoro and Luffy escaped on Komachiyo to get medical treatment for Tama, a sick little girl.
The group arrived at Okobore Town, where a woman named O-Kiku treated Zoro’s wounds. Tsurujo then told them about the suffering in Wano under Orochi's rule. When Beasts Pirates attacked the town and kidnapped Tama, Kiku revealed she was a samurai and joined Luffy and Zoro in chasing after the kidnappers to Bakura Town.
At Bakura Town, they found Urashima, a sumo wrestler pursuing Kiku. When he tried to capture her, Kiku cut off his topknot. Luffy defeated Urashima, but more Beasts Pirates appeared, including Holed’em, who was holding Tama hostage. Luffy quickly took him down and rescued Tama, while Zoro stole a cart full of fresh food for the hungry villagers. Law joined them, scolding Zoro for causing trouble.
Back at Okobore Town, the villagers were overjoyed to receive fresh food and water. Law then led Zoro, Luffy, and Kiku to the ruins of Oden Castle. However, Zoro got lost on the way and ended up at a wharf, where he took a boat ride. While sailing, he received a newspaper reporting that Luffy was defeated by Kaido, leaving him shocked.
During his journey, Zoro ate a lot of sushi and wasabi, but a man named Tonoyasu paid for his meal. They went to an inn, where Zoro won several gambling matches and fought off yakuza thugs. Impressed, Tonoyasu decided to tag along with Zoro, and together they traveled through Kibi to Ebisu Town, where the villagers constantly smiled and laughed despite their hardships.
The next day, Shusui was stolen by a man named Gyukimaru, and Zoro chased him to Ringo. They fought at Oihagi Bridge, but their duel was interrupted when a young woman and Toko ran in, pursued by the assassin Kamazo. The woman begged Zoro for help, and he agreed in exchange for food and alcohol.
Zoro fought Kamazo while Gyukimaru kept interfering, making the battle harder. Eventually, Kamazo stabbed Zoro in the chest with a scythe, but Zoro pulled it out, held it in his mouth, and used Rengoku Oni Giri to defeat Kamazo. After the battle, Zoro collapsed from his wounds.
He woke up in a house in the Northern Cemetery, where the woman had treated his injuries. She gave him food and revealed herself as Hiyori, Momonosuke's sister. The next morning, Brook arrived and informed them that Tonoyasu was about to be executed. Toko ran off, revealing Yasu was her father, and Zoro, Brook, and Hiyori chased after her.
They arrived in the Flower Capital just as Yasuie was executed by Orochi. Zoro was shocked when the Ebisu villagers laughed at his death, but Hiyori explained that Orochi had forced them to eat defective SMILE fruits, taking away their ability to cry. When Orochi tried to kill Toko, Zoro and Sanji moved to protect her. Zoro then attacked Orochi, but his attack was blocked by Kyoshiro, forcing Zoro into a duel. Meanwhile, Hiyori was attacked by the Orochi Oniwabanshu ninja, and Zoro took her to safety after cutting down Raijin.
Zoro and Hiyori escaped to the Enma Shrine and fought off more Oniwabanshu members. Afterward, Zoro decided to get Shusui back from Ryuma's grave. The next day, Zoro rematched Gyukimaru and overpowered him, but their duel was interrupted by Kawamatsu, who reunited with Hiyori. When Beasts Pirates attacked, Zoro and Kawamatsu quickly took them down. Gyukimaru then ran away, and Zoro chased him to an abandoned village, where he discovered a hidden armory filled with weapons.
Hiyori asked Zoro to leave Shusui in Wano, offering him Enma, a legendary sword that belonged to her father, in exchange. Zoro agreed, as long as he could visit Ryuma’s grave. Two days later, Tenguyama Hitetsu presented Enma to Zoro. The sword immediately drained his Armament Haki, but Zoro managed to control it. When he tested it, he accidentally sliced off an entire cliff face. For the next five days, he trained with Enma to master its power.
On the day of the Fire Festival, Zoro and the Straw Hats set sail for Tokage Port, arriving just in time to stop a Beasts Pirates fleet from attacking Kin'emon’s group. Soon after, the samurai allies and Jinbe joined them. The alliance headed for Onigashima, where the Straw Hats took out the Torii Guards at the entrance.
While the alliance planned to sneak in from the back, the Kid Pirates charged in from the front. Luffy went after them, and Zoro followed to stop him. Their cover was blown, forcing them to fight waves of Beasts Pirates. During the battle, Scratchmen Apoo used his music-based attacks to injure them. Zoro quickly figured out how to counter Apoo’s abilities and moved to a safer location with Luffy.
Zoro got separated from the others but kept fighting Gifters until he regrouped with the alliance. He reached the Live Stage, where Luffy was about to jump to the roof to fight Kaido. Zoro grabbed onto him, but Queen (in his brachiosaurus form) caught them midair. At the same time, King and his aerial troops attacked, forcing Queen to spit Zoro and Luffy back down to the battlefield.
Regrouping with the Straw Hats, Zoro sliced through the metal club of Goki, a giant warrior. As the battle escalated, X Drake betrayed the Beasts Pirates and asked to join the alliance. Zoro was suspicious at first, but when Apoo returned, he and Drake teamed up to take him down.
Queen fired bullets containing the Ice Oni virus, which turned people violent before killing them. He gave the cure to Apoo, so Zoro chased and quickly cut him down, handing the cure to Chopper. When Queen tried to shoot Zoro, he destroyed his gun with a slash.
Marco arrived and used his flames to stop the virus. After a brief misunderstanding, Zoro trusted Marco to fly him to the roof, where he joined Luffy, Law, Kid, and Killer against Kaidou and Big Mom. Zoro used Foxfire Style to cut Prometheus and attempted a powerful attack on Kaidou, but it missed. He later cut Kaidou’s scales with Kokujo: O Tatsumaki, forcing him to release Luffy from his jaws.
When Kaidou and Big Mom launched a massive attack, Zoro blocked it briefly, giving the others time to escape. He then wounded Kaidou with Ashura Bakkei: Moja no Tawamure, unknowingly using Supreme King Haki. However, Kaidou countered with Raimei Hakke, defeating both Zoro and Law. As Luffy continued the fight, Law teleported Zoro inside the castle, where Sanji caught him and brought him to Chopper for treatment.
Zoro took a healing drug that temporarily restored his strength but would have painful side effects later. While he was recovering, King attacked him, but Marco intervened. When Zoro fully recovered, he struck King while Sanji attacked Queen. They declared that winning this fight would bring them closer to seeing Luffy as Pirate King.
As their battle continued, Zoro faced King one-on-one. He realized King wasn’t a traditional swordsman but vowed to defeat him by any means necessary. Their fight intensified, with Zoro eventually getting sent flying but catching himself and preparing for King’s next attack.
Zoro continued his intense battle with King, struggling against his powerful attacks and durability. As he fought, his sword Enma started draining his Haki, causing him to falter.
Realizing that Enma was testing him, Zoro fully embraced its power, unleashing his Supreme King Haki. He soon discovered King’s weakness—when the flames on his back went out, his defense dropped. Using this knowledge, Zoro landed a series of powerful blows, ultimately defeating King with a devastating final attack.
Exhausted from battle, Zoro declared himself the "King of Hell" before collapsing. Later, he briefly encountered a Grim Reaper-like figure before falling unconscious again. As Onigashima crumbled, Franky rescued Zoro and took him to Chopper for treatment.
After the war, Zoro woke up alongside Luffy, demanding booze while they celebrated their victory. He was shocked to see Momonosuke’s adult form and later learned that Hiyori had bathed him while he was unconscious, leading to a fight with Sanji. After enjoying the victory festival, Zoro and the crew prepared to leave Wano. They bid farewell to Momonosuke and Yamato, then set sail for their next adventure.
Zoro was asleep on the deck until Robin announced their new bounties. He teased Sanji for having a lower bounty, leading to another fight between them. When Luffy wanted to rush to Arabasta after reading about Cobra’s death and Vivi’s disappearance, Zoro pointed out that Vivi went missing in Mary Geoise instead. He advised Luffy to wait, just like he had with Ace, which sparked an argument with the crew.
Later, the crew encountered a giant warm eddy with Bonney trapped inside. Zoro cut it open, but the ship was attacked by a Mecha-Shark and capsized. Jinbe saved Luffy, Chopper, and Bonney, while the rest were rescued by Lilith and her robot, Vegaforce-01.
Lilith introduced herself as Vegapunk’s clone and tried to rob them, but was warned about Zoro’s strength by another Vegapunk, Shaka. Zoro, wanting answers from Vegapunk, convinced Lilith to take them to Egghead Island.
Once there, Zoro and Brook stayed behind to guard the ship. They released Caribou, insisting he leave, and later had tea while waiting. When CP0 infiltrated the island, Kaku attacked the Sunny, but Zoro woke up and fought him. He defended the ship while Brook protected it. The fight ended when Stussy, another CP0 agent, knocked Kaku and Lucci unconscious, revealing herself as Vegapunk’s secret ally.
Zoro then rushed to stop the rogue Seraphim, clashing with S-Hawk until Edison ordered them to stop. Later, when the crew split up to find the missing Vegapunk, Zoro wanted to help but was told he'd get lost. He stayed with Luffy to guard the captured Lucci and Kaku. When S-Bear and S-Hawk attacked, Zoro fought them off. Lucci and Kaku suggested teaming up, but Zoro distrusted them. However, after Luffy freed them, Zoro teamed up with Kaku to take on S-Hawk.
During the fight against the Seraphim, Zoro realized they resembled King from the Beasts Pirates. When Shaka confirmed they were created using King’s Lineage Factor, Zoro told Luffy, Lucci, and Kaku to watch for when the Seraphim’s flames went out, as that was when they became faster but lost their defense.
The crew was annoyed that he figured this out so late. As the battle continued, Zoro noticed that S-Hawk had left, realizing he was targeting the weaker crew members first. He ran after S-Hawk, with Kaku following to make sure he didn’t get lost.
The next day, York was revealed as the traitor and was captured. Zoro held his sword to her neck as she contacted the Five Elders for help. When Kizaru arrived, Lucci tried to kill Vegapunk but was stopped by Stussy. Zoro attacked Lucci, calling him cowardly, and they fought outside the lab. He refused Luffy’s help, telling him to focus on Kizaru. Lucci mocked him, saying he might not be able to beat Luffy, but he could still kill Zoro.
During their battle, they both sensed the presence of Jaygarcia Saturn, who ordered the Pacifistas to stop. Lucci taunted Zoro, saying their fight was delaying the crew’s escape, but Zoro insisted he controlled the fight’s pace. As they continued, Zoro overheard Sanji calling him a burden, which enraged him. He then used Kokoba Madara Gari to deal a severe blow to Lucci. Jinbe arrived, grabbed Zoro, and helped him escape the island, using a dust cloud to distract Lucci.
On their way back to the Sunny, they encountered Ethanbaron V. Nusjuro, who aimed to stop their escape. Jinbe threw Zoro at him, and they clashed swords, both surprised to see the other wielding a Kitetsu blade.
Zoro then ordered the crew to take off while he and Jinbe held Nusjuro back. As they made it onto the Sunny, Lilith warned they couldn’t leave while Nusjuro was still a threat, but Atlas arrived and knocked Lilith out, sacrificing herself so the crew could escape.
With the help of the Giant Warrior Pirates, the crew successfully fled Egghead and set sail for Elbaf. The giants planned a celebration but delayed it for Luffy to recover and mourn Vegapunk’s apparent loss.
Later, Zoro discussed their escape with Jinbe and Franky, expressing his disgust at Luffy’s concern for Vegapunk, believing an Emperor shouldn’t care so much about an old man’s death. Eventually, Zoro joined the crew in celebrating their survival.
Two days after the party, Zoro, Luffy, Sanji, Usopp, Nami, and the Thousand Sunny mysteriously disappeared, shocking everyone. They had been taken by Muginn to his master, Road, a member of the New Giant Warrior Pirates. Road, angry that his captain had sworn loyalty to Luffy, kept them asleep and placed them in the Land of Gods as a test.
Zoro woke up first, found Luffy and Sanji, and together they killed and ate an Ear God. They later arrived at Bigstein Castle, where they saved Usopp and Nami from a massive cat that had turned into a lion. After defeating the creature, they set out to find the rest of their crew and the Sunny.
While exploring the Land of Gods, they learned that a so-called "Sun God" ruled the area, but his temple was off-limits. Luffy, eager to investigate, rushed ahead, and Zoro excitedly followed. They discovered the Land of Gods was actually an artificial diorama. After rescuing Chopper, they fought the temple's "guardians," with Zoro defeating Muginn.
The Sun God then appeared, furious about their interference, and chased them. The Straw Hats used the cat they had defeated earlier as transportation, with the Sun God vowing they wouldn’t escape.
The crew continued fleeing while the Sun God tried to trap them with a net, but Zoro and Sanji easily broke free. Usopp attempted to shoot through a wall to escape but failed, so Luffy used Gear 4 to break it down. With Nami knocking out the Sun God using Zeus, they finally escaped. While leaving, they narrowly avoided an encounter with Goldberg, Gerd, and her pet Piper. As the giants passed, the Straw Hats crossed a massive bridge leading to the upper levels of Elbaf.
Suddenly, the bridge shook as Road ran down it, trying to escape from Goldberg and Gerd, who were carrying the Sunny. Realizing Road was the "Sun God" who had kidnapped them, Zoro suggested cutting down all the giants, but Usopp stopped him, believing they could be allies. Sanji led the crew to a nearby village instead.
In the Sun World, they evaded Road and set a trap that allowed Sanji and Zoro to knock him out. Moments later, Goldberg and Gerd arrived, finishing Road off. After introductions, Luffy, Usopp, and Chopper ran ahead to the village while Gerd gave Zoro, Sanji, and Nami a ride. When they arrived, Zoro and the others were shocked by the sight of the village.
The rest of the Straw Hats, the Giant Warrior Pirates, and the remaining New Giant Warrior Pirates reunited. Hajrudin declared a feast, but the crew prioritized reuniting Robin with Jaguar D. Saul. They traveled to the Warrior’s Spring with Gerd, where Zoro remained silent as Saul collapsed, only for it to be a dramatic greeting for Robin. As the crew became emotional, Zoro stayed stoic.
Later, Zoro, Luffy, and Usopp explored the Walrus School, playing with giant children. When Zoro suggested fighting them, Usopp scolded him, reminding him they were kids. Zoro was disappointed when the children were easily stopped by their classmates, expecting them to be warriors in training. The crew then met the teacher, Ripley, who explained how modern Elbaf was more peaceful than before. They later returned to the banquet, where Zoro quietly drank while the others celebrated.
Sometime later, Zoro and Nami were confronted by Road, who apologized for his actions. Zoro accepted but reminded Road he would have killed him if not for Usopp, scaring the giant. Road explained he was only imitating the "Sun God," sparking a debate among the giants about Nika. When Loki was mentioned, Luffy insisted he wasn’t evil, but the giants strongly disagreed. Zoro quickly deduced that Luffy had been fooled by Loki because of his desire to see Shanks again.
Zoro agreed to let Luffy retrieve the keys to Loki's restraints but insisted on keeping them until they knew Loki’s true intentions. Nami and Road joined them, and Road took the group to Aurust Castle to find the keys.
Upon arriving, they saw the castle doors had been broken from the inside. While Luffy rushed ahead, Zoro and Nami let Road carry them as they explored. Inside, they found the castle in ruins. Road explained a past battle between Loki and his father, Harald, who fought alongside 100 soldiers, including Jarul.
He also revealed that Harald had torn off his own horns as a sign of peace, impressing Zoro. Road then mentioned that Hajrudin was Harald’s son but not a prince due to his mother being from another kingdom. Though Zoro found it surprising, Road pointed out that humans had similar social divisions, making Zoro reconsider his stance. Suddenly, Luffy appeared, yelling about missing castle guards.
Luffy and the guards argued about who attacked them. The guards thought it was Shanks, which Luffy found ridiculous. They eventually considered that Shanks might have a brother before moving on. As they continued searching, Zoro grew frustrated with the lack of progress and reminded Luffy they hadn’t decided whether to free Loki. Soon, they found a strange Magic Circle on the floor, which Nami recognized as a demon-summoning symbol. This scared Road, and before they could discuss further, a mysterious voice echoed through the room. Road panicked and tried to flee, but a giant axe blocked their escape, making him drop Nami, whom Zoro caught.
The group turned to see "Ya-san," whom Road recognized. He introduced himself as Scopper Gaban—Ripley’s lover and Colon’s father. During their conversation, Luffy accidentally revealed their plan to free Loki, making Gaban laugh.
He warned them about Loki, but Luffy and Zoro quickly lost interest and tried to leave. To keep them engaged, Gaban revealed the key’s location behind the throne. However, before they could grab it, he took it himself and challenged them to a fight for it.
Luffy rushed in, but Gaban easily toyed with him. As the fight escalated, Gaban equipped a pair of axes, forcing Zoro to step in. When Gaban launched a powerful attack at Luffy, Zoro intercepted it, causing part of the castle to collapse. Seeing no choice in such a dangerous fight, Luffy and Zoro prepared to attack together.
However, before they could strike, Gaban suddenly surrendered, revealing he had only tricked them into a fight for fun. Furious, Luffy and Zoro told him they never wanted to see him again, though they still thanked him for the key. As Gaban left, he told them to find him before leaving Elbaf—if they survived freeing Loki.
Zoro is a strict and quiet man, who is also energetic, willful, and focused. Due to his grumpy and short-tempered personality, he frequently reacts in a silly and exaggerated humorous manner. He holds utmost respect and loyalty towards his captain, Luffy, and would sacrifice his own dreams in order for Luffy to get his way. He doesn’t often react to the other crew members’ opinions but when needed, he may get blunt and remind them of the harsh realities.
Zoro has a very poor sense of direction which always gets him lost in every path. He declared that he does not pray to any gods, and has never believed in anything saving himself, which makes him an atheist. As such, Zoro is always seen practicing and honing his fighting techniques since he knows his considerable unraveled potential.

He upholds the robust code of honor of a sword master, and never exaggerates or fabricates his prowess, and occasionally openly acknowledges a shortcoming, even to an opponent. However, he never tries to get out of a battle or use deception to win; he views doing so as weak and disdains those who do.
His poor sense of direction is another distinguishing attribute. He frequently gets lost, even in small, known areas or when guided by someone. Despite this, he often reacts quickly and is the first to spot an enemy or a threat. He frequently fetches an awareness of the people and potentially risky situations around him.
Zoro’s personality has remained constant before and after the time-skip. His demeanor, honor, and attributes never changed. The only thing that changed after the time-skip is the fact that Zoro became a lot stronger and versed in his techniques.

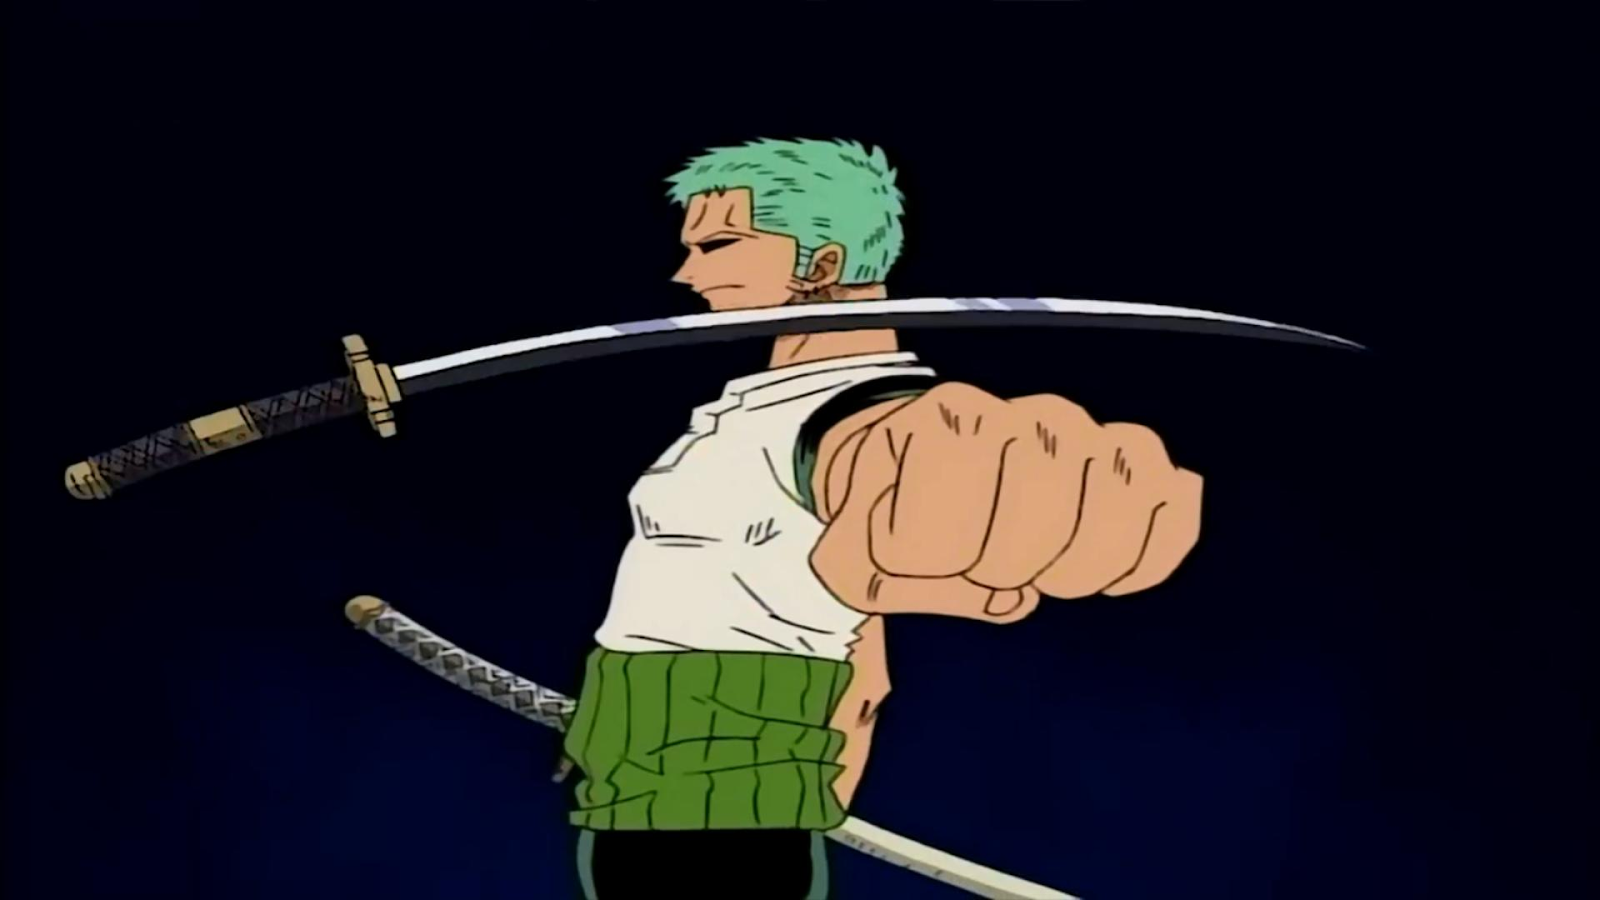
Zoro is a powerful man with average height and fair skin, and trimmed green hair. His three swords are constantly in his possession; they are wrapped in a green haramaki and slung over his right hip so that he can quickly draw them with his left hand. The Wado Ichimonji is the only one of the three swords he typically carries; the other two have changed over time due to being destroyed and then successively getting better replacements.
On his left earlobe, he adorns three similar gold earrings. While engaged in a fierce battle with an opponent, Zoro typically wears a black bandana tied around his left bicep, around his head.
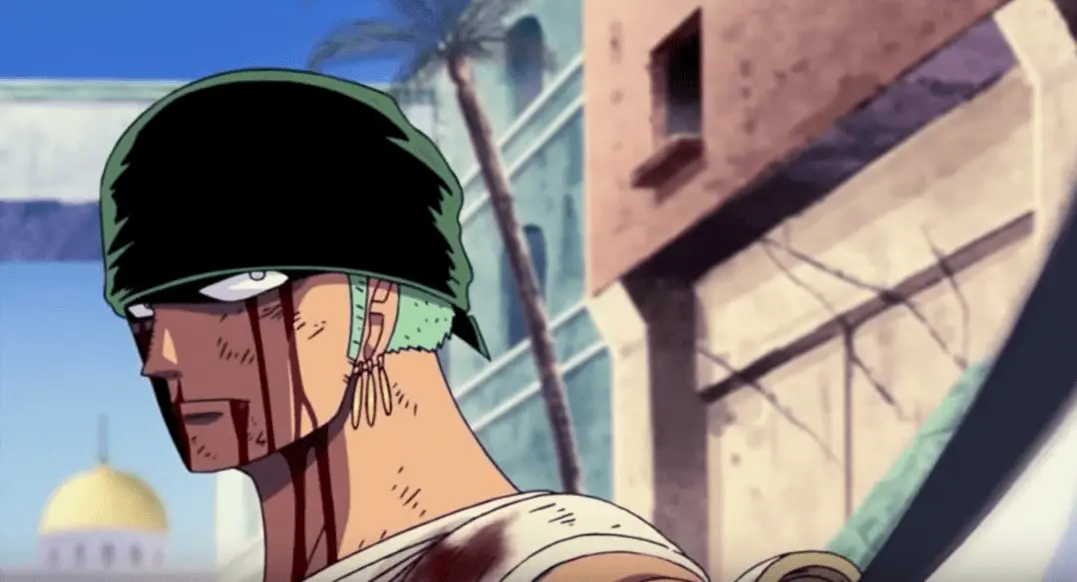
Zoro's body is covered in scars from his many fights, but none more so than the enormous scar that runs from his left shoulder to his right hip and was sustained during his defeat by Dracule Mihawk, the finest swordsman in the world. The scars he caused on his ankles in a futile attempt to liberate himself from Mr. 3's Tokudai Candle Service Set by trying to cut off his feet are his other visible scars. He acquired a second scar above his left eye after the time jump, this one from an unidentified source.

When he was a child, Zoro wore a dark green bodysuit with a two-sword symbol on the upper left side of the outfit. A white band was also fastened around his waist. During the time, he also wore training shoes.
Before the timeskip, he always wore his green haramaki, black trousers with black boots tucked in, and a plain white shirt with three undone buttons at the collar. Only his shirt occasionally changed.
During and after the two-year gap, Zoro gains a fresh scar covering his left eye, which is now assumed to have suffered a severe injury because it is permanently closed. His body gets bigger, displaying noticeably increased muscle bulk, and his slicked-back hair has shaggier ends.

After the timeskip, Zoro is dressed in a long, open dark-green coat that is fastened around his waist by a red sash, into which his three swords are hidden. His left forearm is wrapped in a black bandanna. His coat reveals his bare chest, which is covered by his green haramaki. Moreover, he is notably taller. His outfit also changed with each arc.
Zoro is a renowned powerful swordsman, who was revered in the East Blue even at the time when he hadn’t yet joined the Straw Hats. Known around the globe as “Pirate Hunter Zoro”, he is a fine swordsman, who developed his own Three Sword Style technique while training in Shimotsuki Village in the East Blue. Even without possessing any Devil Fruit abilities, Zoro is considered to be a dangerous opponent, and most enemies would rather escape than facing off against him.
His skills developed over time, but when Zoro faced Mihawk, the greatest swordsman in the world, he vowed to become the strongest after getting overpowered by Mihawk’s formidable skills and sword. Zoro vowed to defeat and slay Mihawk someday once he gets stronger, and even so, during the time-skip, he trained under Mihawk’s guidance.

Zoro also has an extreme level of durability and strength to stand still even after suffering a massive amount of shock and gruesome attacks. Zoro has repeatedly fallen from rooftops and other tall entities, but none of these falls have seriously harmed him. During the Thriller Bark arc, after experiencing Luffy's pain, Zoro bled abundantly until his body was covered in blood, as were many of the rocks in the area. Zoro, on the other hand, not only survived this but also managed to stay awake until his crewmates recovered. At that point, he told them that nothing had happened.
Zoro is mighty physically and regularly spends his time at sea lifting massive objects to keep getting stronger. Zoro's strength greatly influences his swordsmanship since his blows have tremendous force and range in their cutting ability.
Thanks to his strength, Zoro can easily knock superhumanly massive and powerful opponents into the air. He can also quickly dispatch smaller opponents. Zoro is so strong that he has frequently picked up, carried, and tossed opponents of similar stature with relative ease.
Zoro used a skill called No Sword Style, which lets him use the physical might of his body to produce shockwaves that resembled his sword slashes when he was without swords during the event in the Davy Back Battle. With his forward-thrusting arms, he unleashed a whirlwind force, sending the opponent spiraling into his comrade.
Zoro has shown incredible speed and agility when pursuing enemies and dodging their strikes. He can quickly chop down opponents and draw and redraw the sword before they have time to react. He also possesses unusual quick reflexes, and jumping and climbing strength.
After the time jump, Zoro has proven he can swim underwater with great speed and can go across the ocean's depths.
Zoro has incredible levels of toughness and stamina, as he has fought and moved about after suffering several severe wounds. His unexplainable pain tolerance is one of his greatest strengths as a warrior.
Zoro is a brilliant and skillful swordsman; through his training in the Isshin Dojo in Shimotsuki Village since he was a little child, he consistently beat adult swordsmen in the duel, with Kuina being the only exception. He became a superb master swordsman after reaching adulthood and became famed for using three swords in combat.
Zoro is famed for wielding three swords, which has led to the term "Three Sword Style," yet he is also skilled enough to use two or even one, with the former being his original technique. His swordsmanship combines great strength to overwhelm opponents and inflict substantial harm on them; nevertheless, this is made possible by the quality of the swords, as weaker ones would break. Zoro is strong enough to throw flying slashes that can cut and harm objects outside his normal vision field.

Zoro has frequently used animal-like spirits, which frequently appear around him when he prepares an attack, particularly when using No Sword Style. However, this aura shows no signs of being linked to Haki before or after the time skip, the potential manifestation of Zoro's killing spirit or intent.

After the time skip, Zoro has demonstrated that he can still carry out his attacks despite losing one of his swords by using other types of blades.

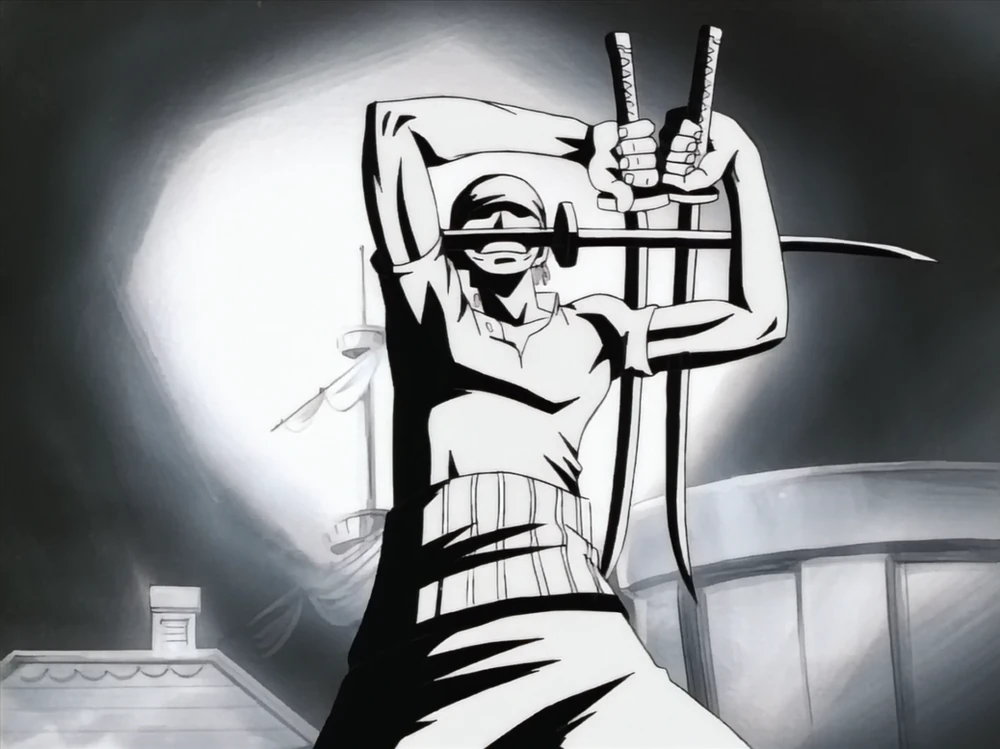
Zoro created the "Three Sword Style," which inspired him to excel as a master swordsman. This is his favorite combat style against multiple strong opponents, even though it involves unconventionally using three swords, holding one in each hand and one in the mouth.
Zoro frequently uses all three swords in his Three Sword Style techniques, repeatedly slicing one or several opponents simultaneously. He can produce whirlwind-like attacks with his Three Sword Style soaring slashes that have the potential to grab and strike a large number of enemies at once. He can effectively evade attacks with all three swords and even block attacks from numerous opponents at once.
In the King of Hell Three Sword Style, Zoro goes all out with Busoshoku Haki and Haoshoku Haki, greatly enhancing the power and range of his attacks over either of his earlier styles. The King of Hell Three Style Sword is based on Zoro letting Enma use up all of his Haki, and he can't sustain this for too long before running out of Haki and would need time to replenish it.

Before learning the Three Sword Style, Zoro's preceding fighting style throughout his formative years was the Two Sword Style. Similar to the Three Sword Style, Zoro is a master of this form of swordplay, dual-wielding two of his swords with considerable strength and ability while combining soaring slashes and drawing and redrawing his moves.

Zoro is a master of the One Sword Style. He has used it frequently to execute finishing moves against various enemies. Flying slashes and other unsheathing and re-sheathing methods are used in this style, much like the Two Sword Style, mostly to defeat or harm formidable opponents with a single attack.

The Nine Sword Style is the most severe use of Zoro's spirit projection skills. When he becomes sufficiently enraged, a dark aura forms about him. He manages to build an illusion of himself with numerous heads and arms capable of slicing through the most formidable opponents and giving him the power of nine swords. Zoro's strike power triples despite the fact that it seems to have a completely spiritual character.

Zoro was initially drawn to the Foxfire Style, the distinctive sword technique used by Kin'emon, the leader of the Nine Red Scabbards. Zoro is known to have "stolen" this method. He can extinguish flames.

Zoro is known to have owned seven swords—all katanas—and occasionally borrowed numerous additional swords and weapons. He typically keeps three swords on hand simultaneously because of his Three Sword Style.

Wado Ichimonji is one of the 21 Meito of the Great Grade. It was forged by Shimotsuki Kozaburo, a renowned Wano swordsmith, and primarily owned by his granddaughter Kuina, a close friend of Zoro.

Sandai Kitetsu is A Grade Meito, considered "cursed, " which would cause its owner severe harm. It was handed to Zoro by the weapons dealer Ipponmatsu in Loguetown, before the time skip. It was forged by the legendary Wano swordsmith Kozuki Sukiyaki.

Enma is one of the 21 Meito of Excellent Grade Swords. The famed warrior Kozuki Oden was the first to use this sword. It was also crafted by Shimotsuki Kozaburo. Kozuki Hiyori, the daughter of Oden, inherited Enma, and gave it to Zoro in exchange for his vow to take Shusui back to Ryuma's grave. Enma has the unique ability to draw a significant amount of Busoshoku Haki from the user.

One of the 21 Great Grade Meito, Shusui is a potent Black Blade. The great samurai Ryuma is credited with using it, and Wano Country holds it in high regard.

Yubashiri is one of the 50 Meito of the Skillful Grade. After seeing the swordsman's enormous fortune, Ipponmatsu presented it to Zoro, which had once been a family heirloom for Ipponmatsu.
Zoro had two nameless katanas that Shimotsuki Kozaburo gave him as a kid. They were used with Wado Ichimonji for an unknown amount before being broken during Zoro's first fight with Dracule Mihawk.
Zoro used some weapons as a substitute when he had a sword missing or broken. He used these weapons to use his Three Sword Style. Here’s a list of those weapons.
Zoro used Johnny and Yosaku's Nakiri swords, which he had borrowed, to battle in Arlong Park while wielding just Wado Ichimonji.
Yubashiri was once replaced with a Marine cutlass for the battle on Enies Lobby, and it was ultimately destroyed.
Zoro used a tanto intended for him to execute seppuku to kill Toyama Tsujigiro.
Kamazo was using a scythe, which Zoro took after it stabbed him and used to kill Kamazo in place of the missing Shusui.
Being an already master swordsman, Zoro’s Haki is a formidable power during his battles. He is known to be one of the few people who wield all three forms of Haki.

Zoro can use Haoshoku Haki, a highly distinctive kind of Haki whose users are said to possess kingly traits. Zoro was unaware he possessed this power, which had lain latent within him. His three swords will all originate black lightning due to the advanced application he may use to infuse it into them.

Zoro has a high level of proficiency with Busoshoku Haki. After learning it from Dracule Mihawk, it became his primary expertise. He mastered hardening and imbuement during the two-year time gap, making both black. Despite this, hardening and Busoshoku Haki are frequently used in intense combat to injure Logia users.
Zoro is a very adept user of Kenbunshoku Haki as well.
Zoro appears in the following Video Games as a playable and featuring character:
| Game Name | Release Date |
| Jump Super Stars | August 8, 2005 |
| Jump Ultimate Stars | November 23, 2006 |
| Battle Stadium D.O.N | July 20, 2006 |
Zoro appears in a special episode of One Piece X Toriko.
A. Zoro is a fighter, and master swordsman. Since he is a pirate, he cannot be considered either a hero or a villain.
A. Wado Ichimonji is considered as Zoro’s most powerful sword. However, even since he received Enma, Kozuki Oden’s sword, it is debatable which of the two is more powerful.
A. Dracule Mihawk, better known as Hawkeye Mihawk, is Zoro’s strongest enemy.
A. It is unknown what happened to Zoro’s left eye. It cannot be presumed that he may have lost it. The mystery behind it is yet to be known.
Web Search
plagiarized
Sources
Searches Found
These sources show definite matches with your content and require attention.
These sources show 0% match but may contain similar content. We recommend reviewing them manually to ensure originality.
Comparison